How to Control the Raspberry Pi 5's GPIO Using an Android Phone
Here’s how you can remotely control a Raspberry Pi 5 using a smartphone and Bluetooth low energy.
January 18, 2024
At a Glance
- • Programming utilizes Igpio C and btferret/btlib Bluetooth interface
- • GPIO control will be demonstrated by remotely blinking an LED attached to the Raspberry Pi 5’s GPIO 17
- • Get inspired to control other displays and sensors remotely
The Raspberry Pi 5 is a fantastic little computing machine. However, no matter how powerful the Raspberry Pi 5’s CPU may be, the Raspberry Pi 5 would be a useless lump of silicon and FR4 without a means of interfacing its computational prowess with the real world. While the current Raspberry Pi 5 hype is focused on its higher speed and array of new high-speed digital interfaces, there is no comparative spotlight on the Raspberry Pi 5’s Bluetooth capabilities. So, fire up your Raspberry Pi 5 and grab a cheap Android phone. I am going to show you how you can remotely take command of your Raspberry Pi 5’s general-purpose input/output (GPIO) using that Android phone and Bluetooth low energy.
Install the lgpio C API
The installation of the lgpio C API enables the programmatical manipulation of the Raspberry Pi 5’s GPIO subsystem (GPIO pins, SPI, I2C, PWM, etc.). If you intend to use a separate personal computer to cross compile your Raspberry Pi 5 lgpio-based applications, you will need to copy the lgpio libraries installed on the Raspberry Pi 5 to a directory on the personal computer. Installation and use of the lgpio C API is detailed in the lgpio documentation, which can be found along with the lgpio download package on GitHub.
Download the btferret/btlib Bluetooth Interface
The btferret/btlib Bluetooth interface is a C package that targets the Raspberry Pi family. The btferret/btlib Bluetooth interface file package is not dependent on bluez and is programmed at the HCI (host controller interface) level. The btferret/btlib Bluetooth interface file package is composed of btferret.c, btlib.c, btlib.h, and devices.txt. A Raspberry Pi 5 btlib application can act as a Classic or BLE server or client. The btferret.c code is a menu-driven example application that runs out of the box on a Raspberry Pi 5 and demonstrates how to utilize the various functions contained within the btlib library. The detailed instructions for compiling and running the btferret code on a Raspberry Pi 5 can be found in the btferret/btlib Bluetooth interface documentation, which also includes a detailed description of the HCI Bluetooth interface. The btferret/btlib Bluetooth interface code and documentation are also available from GitHub.
Add lgpio API Calls to the btferret Application
The btlib library functions that make up the btferret.c application code can be extracted individually and modified to create a customized Raspberry Pi 5 Bluetooth application. To keep things simple, we will not make any changes to the original btferret.c source code and use it as is. Instead, we will insert the necessary lgpio API calls into the original btferret.c source code to enable access to the Raspberry Pi 5 GPIO pins. Our goal is to use the slightly modified out-of-the-box btferret code to receive a command from the Android phone over a BLE link to blink an LED attached to the Raspberry Pi 5, which will be acting as a BLE server.
Before we begin work on the btferret.c source code, we need to define the devices, BLE services, and characteristics that will be associated with the Raspberry Pi 5 BLE server. The devices, services, and characteristics are laid out in the devices.txt file depicted in Figure 1. A full explanation of the devices.txt contents can be found in the btferret/btlib Bluetooth interface documentation. Our Raspberry Pi 5 BLE server device name is pi5a and has a Bluetooth address of D8:3A:DD:98:40:C0. The BLE 18xx services are predefined Bluetooth services and are defined in the Bluetooth specification. The BLE service that begins with 6b5ed4bd is a custom service that we created. Our custom BLE service is associated to a custom characteristic called gpioCntl. The gpioCntl characteristic contains four bytes of data and can be read and written by the BLE server and the Android phone client.

Figure 1: Contents of the devices.txt file. FRED EADY
Let’s begin our btferret.c modification by adding the include file lgpio.h to the btferret.c source code as shown in Figure 2. The LED we want to blink is attached to the Raspberry Pi 5’s GPIO 17. Once again, referencing Figure 2, you can see that there are two lines of code that configure GPIO 17 as an output and sets the GPIO pin’s initial logical state.
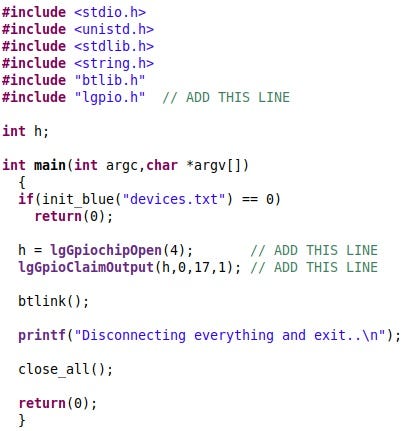
Figure 2: Configure GPIO 17 using lgpio API calls. FRED EADY
To blink the LED, we must use the client BLE application running on the Android phone to write to the custom Bluetooth characteristic gpioCntl we defined in devices.txt. The BLE server code we have added that handles the characteristic data and blinks the LED is shown in Figure 3. As you can see, the LED blink code will only be executed when the command from the Android phone sets the first byte of the gpioCntl data array to 0x55.
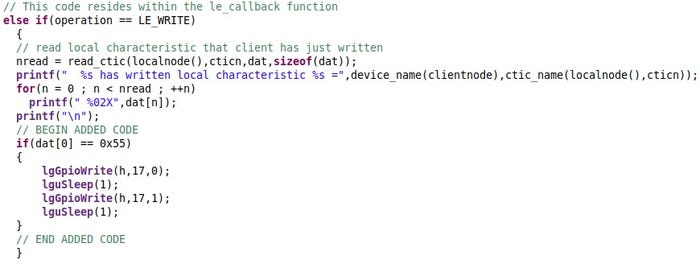
Figure 3: Blink the LED using lgpio API calls. FRED EADY
Connecting to the Raspberry Pi 5 BLE Server
Using a BLE test tool such as LightBlue is the quickest and easiest way to establish a connection to the Raspberry Pi 5 BLE server application. Our btferret Raspberry Pi 5 application is stored in the /home/fred/pi5_apps directory and is called bt1. The steps necessary to start the Raspberry Pi 5 BLE server are shown in Figure 4.
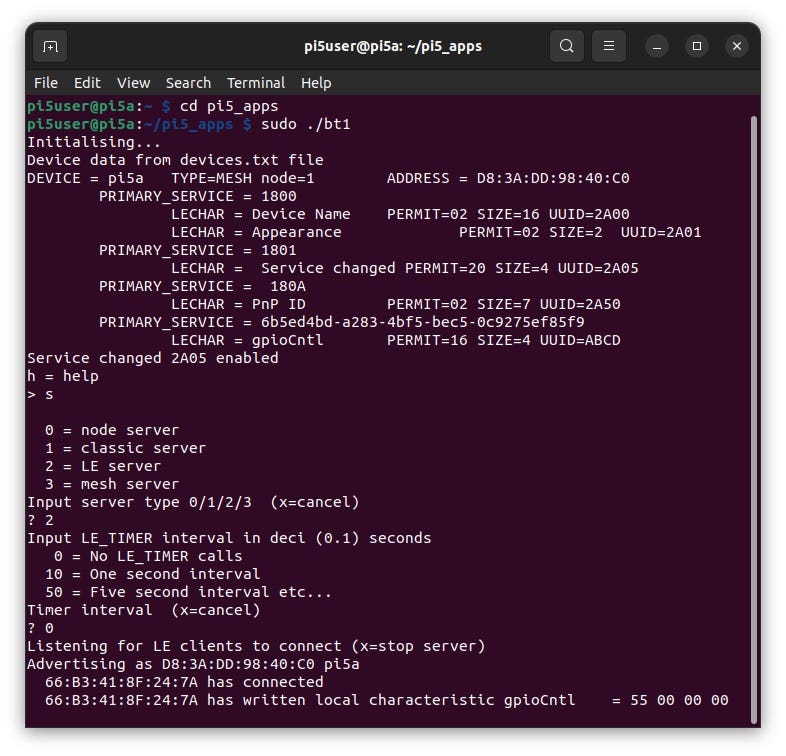
Figure 4: Activate the BLE server and process client commands. FRED EADY
The LightBlue Android app will scan for our advertising Raspberry Pi 5 BLE server and present us the option to connect as shown in Figure 5. Tapping on the pi5a CONNECT button will reveal all of the BLE server service and characteristic data as well as server device information. A tap on our custom characteristic will take us to a LightBlue panel that will allow us to read and write to the custom characteristic. The result of writing 0x55 to the BLE server can be seen in Figure 4.
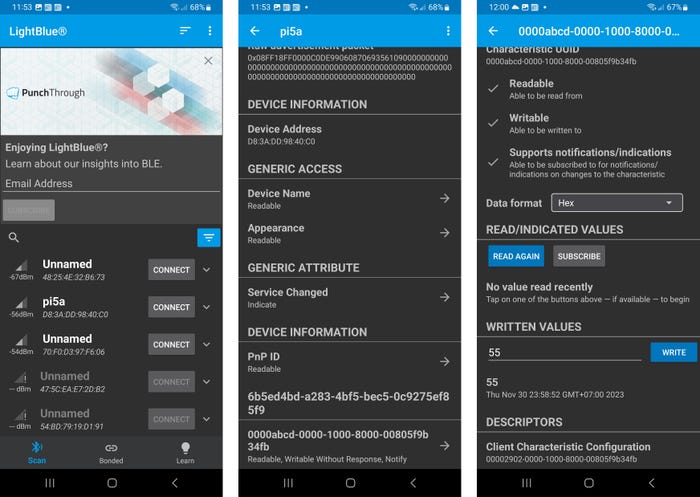
Figure 5: LightBlue connection and command sequence. FRED EADY
We will want to code a custom Android app after our Raspberry Pi 5 BLE server application is completed. I have written a very basic custom Android BLE client app to complement our Raspberry Pi 5 BLE server using B4A (Basic 4 Android). As B4A is a free tool, my app can be used as a template to code your own custom Android client app. You can obtain my B4A Android BLE client project from the EDTP Electronics FTP server (www.edtp.com/Android_ble_client.zip).
About the Author(s)
You May Also Like


