Looking to add some mood lighting and atmosphere to your home? Gadget Freak Andries “Quindor” Faassen shows you how to use an ESP8266 WiFi module to build your own network-controlled LED dimmer for indoor and outdoor lighting.
February 7, 2018

For a while now, I’ve been working on building my own network controlled LED dimmer. I sampled some commercially available remotely controllable LED dimmers, but I found they all either lacked some function I wanted or where WAY too expensive to rollout throughout my house. So, I decided to construct my own version!
|
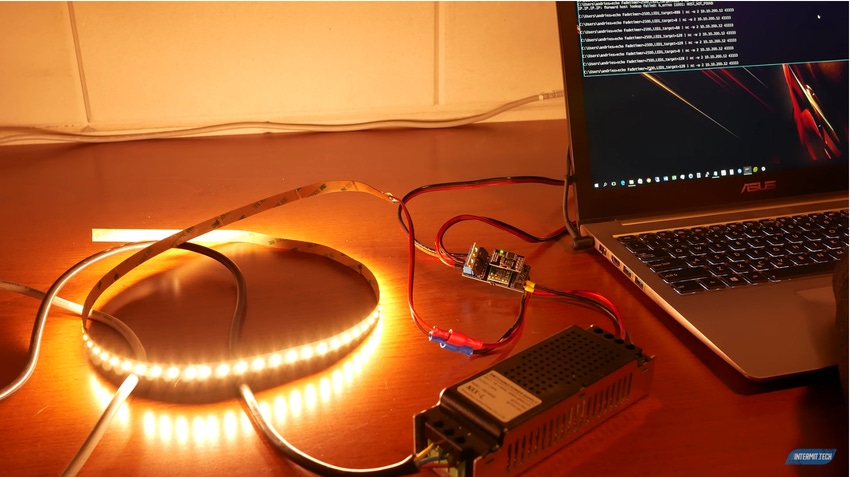
The finished QuinLED module. |
I’ve been toying with LED strips for several years now using (mostly Chinese) LED controllers. RGB is ok, but for nice lighting in my house I focus on the softer and warmer Warm White LEDs.
To explain the technique we are using a little bit better I will explain pulse width modulation (PWM) dimming in short. Since the advent of digital LED lighting dimming,dimming the light by lowering voltage now longer works. LEDs have a whole different nature than analog lamps and just sending it a lower voltage will only make it flicker or turn off completely.
To make LEDs dimmable we are using a technique called PWM dimming. The name pulse width modulation sums it up quite nicely. Instead of sending a continues stream of a certain voltage (12v in our case) we are very quickly sending pulses of the correct (12v) voltage to the LED. Because of how our eyes work, depending on the duration or load/duty of the pulse, we will see a certain intensity of light.
In one sentence this is an ESP8266-based PWM WiFi controllable dimmer. I call it the QuinLED. The ESP8266 is a microcontroller similar to an Arduino or a Pix. In this case we will program the ESP8266 to dim LED lights connected to it. Once the module is complete you should be able to connect it to either indoor or outdoor lights depending on your preference.
Here we will concentrate on building the controller:
QuinLEDdimmer v2.6 rev 1.00 PARTS LIST |
|
|
|
|
|
Board Parts |
|
|
All parts selected in quantaties to build min 5 boards! |
|
|
Part | Type | Quantity |
QuinLED v2.5 rev 1.10 |
| |
ESP-01 | 1 | |
STP16NF06L | 2 | |
LM2596 | 1 | |
5mm pitch Green | 2 | |
5mm pitch Black | 1 | |
ESP Socket | 1 | |
Pin headers | 1 | |
2 pin jumper | 2 | |
0805 10K ohm | 2 | |
|
|
|
External Parts |
|
|
All parts selected in quantaties to build min 5 boards! |
|
|
Part | Type | Quantity |
CH340G | 1 | |
5x Dupont FM-FM | 5 | |
USB Program board with socket | 1 | |
|
|
|
LED Parts |
|
|
Buy as needed! |
|
|
12v 50cm Alu stip 5630 | 1 | |
12v 5m 3528 LED 60LED/m | 1 | |
18v up/down LED Cube | 1 | |
|
|
|
Power Supply parts |
|
|
Buy as needed! |
|
|
12v, 2A | 1 | |
12v 20A | 1 | |
24v 6A for garden lights | 1 | |
20awg Silicon electrical wire | 1 | |
Barrel Jacks | 1 | |
24v -> 18v for garden lights | 1 |
Soldering and Assembly
After getting all the required components together it’s time to solder them onto the board. I made a 30-minute video going through all the steps of soldering everything together trying to show that it’s actually quite easy to do so yourself!
To make the soldering a bit easier, the order of soldering I use to stick it all together is as follows:
We start off with the pin headers for the DC-DC converter. I solder these with the long leg pointed down and with the plastic spacer on the top of the board
Next are the 2×2 pins for the jumpers and the 5×1 pin headers. These both go in with the long side and plastic spacer on top
Then, in order to easily be able to disconnect or change the ESP-01, it’s best to solder the 4×2 header socket
After that slide the DC-DC voltage converter on the pins you soldered earlier. This can be quite a tedious process and might need you to bend some pins a little bit to get it on there. Once you get it on in the correct orientation (the little adjust screw goes closest to the ESP socket!) you can need to solder it on the top side and bottom side
Once that’s done, solder on the 2×1 input and 4×1 output screw terminals. Be sure to use plenty of solder so that they have a good connection to the board to transport all the current
Finally we can put on MOSFETs. Orient them so that the metal parts are both facing inward and the black side with the text is facing outward. Push them in from the top of the board to the bottom and push them as far down as they go. I mostly space them so that they are both pointing outward a bit giving better access to the jumpers in between them (Although you really only need to put the jumpers on once to flash the board)
And that’s it, your board is all together and ready for setting the voltage converter and flashing!
Flashing
To get started with the ESP8266 ESP-01 I recommend flashing and programming it before soldering it down. This way you know it’s working and that the program code is also functioning. Depending on how you mount it on your board it can be a bit hard to do so later on!
I have uploaded a ZIP file that contains all the programs, firmware and code you are going to need to use. You can feel free to modify it for whatever specifications your particular lighting project requires.
Here's a tutorial video outlining the flashing and programming process:
For the flashing I’ve acquired some convenient little USB adapters with a serial chip on-board which allow you to plug in and run an ESP-01 directly from your USB port. This saves a lot of time because you don’t have to fiddle with serial wires and such. Once you are done programming it, just plug it into a QuinLE board and you are done!
As can be seen in the video I have multiple of these little adapters of which I have modded one to always be in “flash mode.” That way I can very quickly flash an ESP-01, then plug it into a normal USB adapter, program it, and move it over to the QuinLED.
Once you’ve flashed the ESP-01 you want to use on the QuinLED board (either using serial wires or the USB adapter) open up ESPlorer. You will need to have Java installed for it to work.
ESPlorer should automatically detect the COM port your ESP is connect to, if not, select the right port and click “open.” That should open the serial port and make the connection with the ESP-01 module. Hit the “heap” button (lower part of the window) a few times and see if you get a response back. Often the first and second time will be a bit of garbage but after that it should work.
|
Once programmed, the dimmer will dim your LED lighting at your command. |
Programming
I’ve prepared a “init.lua” file which holds the whole program needed to have the ESP-01 make a network connection and perform the dimming functions.
In ESPlorer click the “open file” button and load the “init.lua” file included in the ZIP file.
There is lots of code in there, but it’s structured like this:
Default boot settings for all values
WiFi settings (we will need to edit these)
Network socket server
Command interpret and PWM dimmer routine
Next you'll want to configure your setup for your WiFi network and password
In the code there is a line called: wifi.sta.config("CampZone-pub","")
This is the line we need to change to match the settings for your home WiFi network.
To change it edit the line to contain your WiFi network details such as: wifi.sta.config("blablaWiFi","pass123supersecret")
To save the code to the ESP-01, hit the “Save to ESP” button below the code screen. This will start the transfer of the code line for line to the ESP-01 module.
After that’s done, hit “Save & Compile” and when that completes hit the “Reset” button.
Now your ESP-01 will be running the new code and should be connected to your WiFi network!
The code uses DHCP to ask for an IP address from the WiFi network. But which IP did the ESP-01 get?
Using the command: =wifi.sta.getip() The module will report back which IP it got. Try and ping it to see if you can reach it!
Controlling the QuinLED
Now that programming is done, the next step is controlling QuinLED to dim your LED lights!
To control QuinLED I make use of a program called Netcat. This is a little tool which uses TCP sockets to send text data to another network device. In the case of my QuinLED code this is using TCP 43333.
There is no official way to install Netcat (or NC for short). Mostly I just dump the entire contents of the ZIP file (included in the ZIP file above) into a directory that’s in the path (such as c:\Windows\System32). After that you can run the command from anywhere by running “nc.exe.”
In the ZIP file I have also included the command line way to send dimming commands to QuinLED!
It looks like this:
echo Fadetimer=2500,LED1_target=888 | nc -w 2 IP.IP.IP.IP 43333
Fill in the correct IP address where it says IP.IP.IP.IP and try to see if the command works. If the ESP-01 receives the commands you should see some status messages scroll in the output window of ESPlorer.
If you did, that means everything is working and you are ready to connect the ESP-01 module to the QuinLED board. Or if it was already on there, you should have seen any connected LED strip dim to the desired value!
And that should be it, you now have a fully WiFi network controllable LED dimmer!
How to Hook it All Up
Here's a video on how I hooked the QuinLED to some Chips on a Board (COB) Lights. The video goes into depth with step-by-step instructions, but in summary the process is:
Strip wires of COB LED downlight and attach wire ferrules.
Strip wires inside ceiling pots and use connector blocks to prepare paralel wiring.
Connect lights to connector blocks and insert into ceiling.
Connect string of lights to QuinLED output port.
Make sure the QuinLED input voltage is set to the correct voltage for the lights.
I also made a video series on connecting the dimmer to some outdoor garden lights:
Obviously this controller isn't limited to the setups I present here. Feel free to reach out to me with any questions and let me know how your own projects are going!
Andries “Quindor” Faassen is a tech enthusiast living in The Netherlands. He can be reached via his blog, Intermittent Technology or via email at: [email protected].
[All images and video courtesy Andreis Faassen]
About the Author(s)
You May Also Like


