Theremin? Bleh! Therebone? Yeah! (Part 3)
One step closer to the soon-to-be-legendary therebone.
May 1, 2023

In Part 1 of this ever-growing mega-mini-series, "Introducing the Soon-to-be-Legendary Therebone," we discussed how I’m currently writing a series of "Arduino Bootcamp" columns for anyone who wants to learn how microcontrollers work. These columns appear under my "Cool Beans" byline in Practical Electronics, which is the UK’s premier electronics and computing hobbyist magazine.
We talked about how I’m basing a series of experiments around a classic single-digit common cathode 7-segment LED display in conjunction with a variety of sensors and actuators. In addition to input devices like momentary pushbutton switches and simple sensors like light-dependent resistors (LDRs) and thermistors, I’m also planning on playing with an ultrasonic range sensor, like the HC-SR04, which can provide a 2- to 400-cm non-contact measurement function with an accuracy of around ±3mm.
We also discussed a few interesting instruments, including the sarrusophone, the glass armonica, and the theremin. In the latter case, we control the volume and frequency of this little rascal by waving our arms around in the air (kids love to do this and so do I). This led us to the idea of building our own instrument, which we decided to name the therebone because its functioning will be reminiscent of a trombone. In this case, we will employ a piezoelectric buzzer or a small loudspeaker to play the tone, and we will use the values returned from our ultrasonic range sensor to control the pitch.
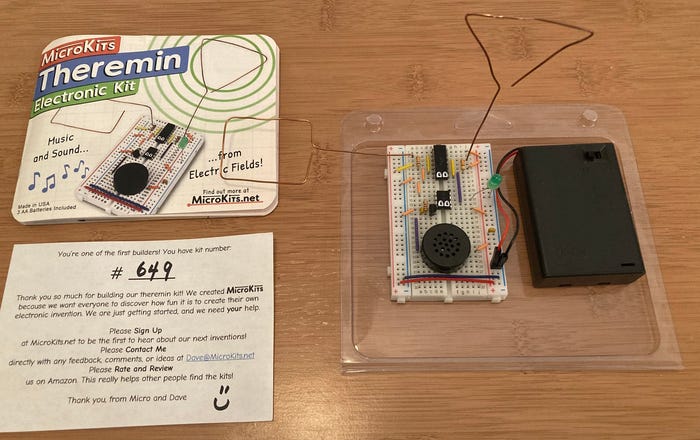
Actually, I feel like an old fool (but where are we going to find one at this time of the day?). The reason I say this is that, in Part 1, I mentioned the breadboard-based (no soldering) theremin kit available from MicroKits Theremin. I remember thinking, “I should get one of those myself.” So, you can only imagine my chagrin when, whilst rooting through one of my boxes of bits and pieces, I discovered I’d already done so many moons ago.
As soon as I got a spare moment, I spent a happy 30 minutes assembling this little beauty. I’d like to give a shout-out to the kit’s creator, David Levi, for a job well done. In addition to coming equipped with everything you need, including the batteries (which still worked after their indeterminate sojourn in the bottom of my box), the accompanying instruction book is extremely well written. This includes several intermediate test points where the user pauses to verify that things are working as planned.
But we digress… In Part 2, "On the Hunt for the Soon-to-be-Legendary Therebone," I explained how I’d connected my 7-segment display and created an array representing the segments corresponding to the numbers 0 through 9. Also, how I’d defined the segments used to present a cheery “HELLO” message on the display.

Our first experiment involved an automatic sequence that repeatedly counted from 0 to 9. Next, we added a couple of 2-pin momentary pushbutton switches with associated pull-up resistors. We set things up such that pressing one switch causes the count to increment, while pressing the other switch causes it to decrement. As part of this, we also experienced the effects of switch bounce and implemented a simple software solution to mitigate the problem (see also "How to Keep a Flipped Switch from Bouncing Like a Golf Ball Dropped from the Roof").
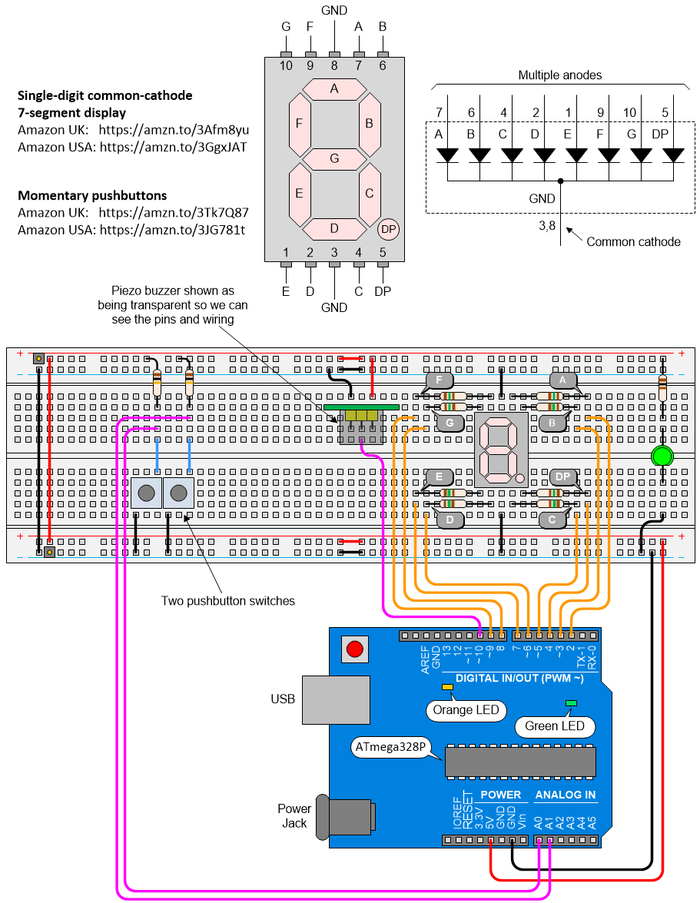
Our most recent addition is a passive piezoelectric buzzer mounted on a small breakout board (BOB). An active piezoelectric buzzer has only two pins and requires only the application of power (say 5V) and ground (0V) to generate an annoying tone. By comparison, a passive piezoelectric buzzer like the one we’re using has three pins: power, ground, and an input signal. Applying a square wave to the input generates a tone. Varying the frequency of the square wave modifies the pitch of the note. As a result of all these modifications, our breadboard setup currently appears as follows:

Thus far, all we’ve done is to create a function that explicitly causes the signal driving the buzzer to go HIGH and LOW five times with a 1 millisecond delay between transitions. The result sounds like a tinny “click.” Whenever we press one of our pushbuttons, we call this function to emphasize its activation (maybe I should also call the function when the pushbutton is released—I’ll have to try that when I get a free moment).
Now, even though we understand that tickling our ears with the plaintive sound of the therebone is our ultimate goal, we are pacing ourselves, performing lots of little experiments along the way.
Suppose we had only a single pushbutton switch to accompany our 7-segment display. What could we do with this setup? In fact, there are myriad possibilities. For example, we could start by implementing a simple random dice rolling program. In this case, the display could present some pattern to indicate its readiness for action. Perhaps we could simply illuminate the middle G segment. Maybe we could cause this segment to flash. When the user presses the button, our program could generate a random value between 1 and 6 and present this value on the display. After a few seconds delay, the display could return to its “ready for action” condition.
Of course, we could always embellish this a little. For example, instead of simply presenting our newly generated random number, we could start by presenting a random sequence on the display before landing on the final value. Next, we could introduce a small modification such that the random sequence commences changing values quickly, gradually slowing until it eventually settles on the final value.
Next, we could add a click effect to the button press followed by additional audibly different clicks accompanying the changing digits. Maybe we could play a cheery jingle to accompany the final digit. In turn, this leads us to the Arduino’s tone() function, which can be used to generate anything from individual notes to full-blown show tunes (so long as these tunes can be played one note at a time).
OK. I’ve started the ball (or dice) rolling. What else could we do with a single button and our 7-segment display? How about the two buttons we already have on our breadboard? Suppose I told you that I’m planning on adding four more buttons, thereby giving us six in all—how many different applications and games can you think of that we could implement with this profusion of pushbuttons? Also, can you come up with a list of simple jingles and sound effects (SFX) you think might come in useful? Which sounds or sequences of notes could we use to indicate success or failure conditions, for example?
If you have any thoughts you’d care to share, please post them in the comments below or email me at [email protected] (and don’t neglect to take a gander at my Cool Beans Blog). Until next time, have a good one!
About the Author(s)
You May Also Like


.jpg?width=300&auto=webp&quality=80&disable=upscale)

