Raspberry Pi & Simulink: A Future of Graphical Programming
February 26, 2014

The unquestioned success of the Raspberry Pi has swept the world. More than 2 million boards have been sold since its launch less than the two years ago, and dozens of startups have been formed just to support the single-board computer's ecosystem.
When it started out, the Pi's goal was to provide a simple and easy platform to introduce computer science to high school students. Similar to the Pi, graphical modeling environments such as Simulink make it easy for students to learn engineering concepts. More importantly, you can combine the two and program your Pi from Simulink with the click of a button.


For teachers and mentors of young makers, this combination of Simulink and low-cost hardware boards is exciting because you can focus on engineering/design concepts, instead of teaching a programming language. You can also capture the attention of young audiences with the instant gratification of running a graphical model on their Pi with the click of a button.
As we learn more about the platform, we have been introduced to a lot of groups working to expand functionality. At the 2013 Open Hardware Summit at MIT, we got a glimpse of the Simulink graphical programming environment geared toward the Raspberry Pi. We were surprised by the system's capabilities.
The following are a few examples of how Simulink can be useful. These projects can be used to teach basics of computer vision systems to young makers. The first one demonstrates a color inversion algorithm using simple arithmetic. The second one goes over a slightly more complex edge detection algorithm. Each example covers the goal of the project, the schematic of a Simulink model, and steps to program your Raspberry Pi.
In order to use these examples, you need to have MATLAB, Simulink, and the free hardware support package for Raspberry Pi installed. Other project ideas and the resources required to execute these are available on MakerZone.com.
Color inversion
Color inversion is a popular accessibility feature for people with visual impairments. In its simplest form, you would implement color inversion using three steps:
Get the R,G,B components of an image.
Subtract these component values from 255.
Recombine the new RGB to see an image with inverted colors.
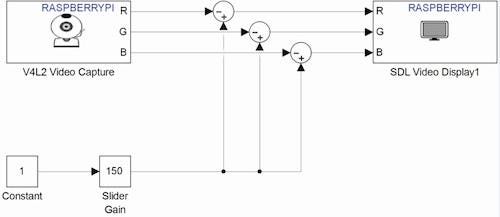
Figure 1 above shows a snapshot of a Simulink model that implements this algorithm. All the blocks in this model are built-in library blocks in Simulink. A user can easily recreate this model by using the drag and drop user interface.
On the hardware side, a webcam is connected to the USB port on the Raspberry Pi to capture the video. The Raspberry Pi is connected to the computer running Simulink. Assuming you have configured your hardware options to select the Raspberry Pi as the target and set the simulation mode to External, you can just click the green play button on the menu to run this model automatically on the Raspberry Pi without manual programming.
About the Author(s)
You May Also Like


.jpg?width=300&auto=webp&quality=80&disable=upscale)
