The Linux Steampunk Conference Badge
Break the ice at your next tech conference by building a full function, Steampunk-themed Linux wearable.
October 12, 2017

I prototype, write, speak, and consult on physical computing gadgets and wanted a one-off attention-grabbing conference badge that would break the conversational ice when I walked around trade shows. That quest started a few years ago, with the first generation Arduino Pro-Mini and a 1.8” color TFT screen conference badge.
|
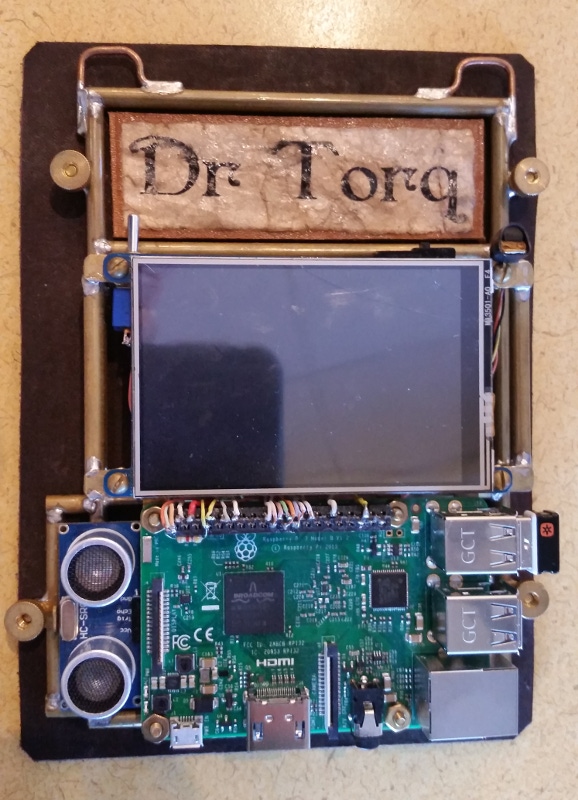
The Gen-5 Steampunk Conference Personality Identification Apparatus. |
The latest Generation 5.0 model uses a Raspberry Pi 3, a 480 x 320 color TFT touchscreen display, an ultrasonic sensor, a DS18B20 thermometer, a leather and brass-tubing framework, and an antique-looking 'Dr Torq' name plate. There's also an auxiliary Arduino Pro-Mini, to handle near-real time input/output jobs. The badge is Internet-enabled via WiFi and plays full-motion, promotional mp4 videos on the display. A USB 2400 mAh power bank supplies power for about four hours of show-floor attendee interaction. I can use the Chrome browser and LibreOffice on the display with a wireless Logitech keyboard or remotely log into the badge over SSH. Think of it as a full-function, Linux wearable.
The badge also promotes my eclectic, slightly quirky engineer/inventor/geek 'Dr Torq' persona. The good Doctor wears a top-hat, pin-striped vest, tweed jacket, tie and pleat-less/cuff-less trousers during tech talks and appearances. It's fun and makes my Steampunk character readily approachable.
Of course, encouraging audiences to build their own wearables and nano-Linux physical computing devices is also part of my schtick, as is soft-selling my consulting expertise. Making it fun, through over-the-top exaggeration and the Steampunk theme helps accomplish those things. While they may not be able to always define it, everybody recognizes and enjoys the Steampunk aesthetic.
Let's look at the Gen-5 badge in more detail.
Raspberry Pi 3
I chose the Raspberry Pi 3 model B because it's a powerful Linux-based nano-computer, featuring a quad-core Broadcom BCM2837 64-bit ARMv8 processor, with 1 GB of RAM and onboard Bluetooth and WiFi. A customized version of Raspbian Linux, burned onto the micro-SD card, made using the 320x480 TFT color touchscreen display a plug-and-play operation.
Touchscreen
The touchscreen is a PiTFT Plus 480 x 320 3.5" TFT+Touchscreen plate for Raspberry Pi. It normally plugs directly into the Pi using the 2 x 20 header. Doing it that way made the badge too thick, so I built a cable to mount the screen above the Pi. The display is also upside down, with the connector at the top because it was easy to keep the wiring straight. I corrected the display orientation with a parameter change at boot up. Touchscreen operation is still upside down, so I may turn the display right-side-up and reconfigure the cable, in the future.
Let's next look at the parts list, before continuing on with other details of the badge.
Part Description | Quantity | Supplier | Part Number |
1 | DigiKey | 1528-2347-ND | |
32 GB micro-USB card with TFT-capable Raspbian image | 1 | Best Buy | Samsung 32 EVO+ |
1 | DigiKey | 1528-1348-ND | |
1 | DigiKey | 1568-1055-ND | |
1 | DigiKey | 1568-1209-ND | |
1 | DigiKey | 1568-1421-ND | |
1 | DigiKey | DS18B20-ND | |
10-32 brass thumbscrews | 4 | Hardware store | |
10-32 x 1/2” brass screws | 12 | Hardware store | |
10-32 brass nuts | 12 | Hardware store | |
10 gauge wireless | 3 inches | Hardware store | |
3/16” thin-wall brass tubing | 2 - 36" lengths (use as needed) | Hobby Store | |
1/4” x 1/16” thick brass flat stock | 1 - 36" length (use as needed) | ||
26 gauge flexible wire | salvage from old serial mouse cable | ||
22 gauge solid core wire | salvage from solid-core CAT 5 cable | ||
USB-mini USB cable | 1 | ||
2 x 20 female header | 1 | connector salvaged from old IDE hard drive cable | |
2200 to 10000 mAh 5 volt power bank battery | 1 | ||
SPST Toggle Switch | 1 | Sparkfun | COM-09276 |
SPST Micro-Switch | 1 | Sparkfun | COM-00098 |
Header Push Pins | as needed | Sparkfun | PRT-12693 |
1K resistor (brn/bblk/red) | 1 | Sparkfun | COM-13760 |
Through-Hole Resistor – 4.7K ohm 5% 1/4W (yellow/purple/red) | 1 | Adafruit | 2783 |
Optional: | |||
Logitech K400 keyboard/mouse-pad | 1 | Office Depot | 729357 |
Tools: | |||
Weller 100/140 Watt soldering gun | |||
Plumber's copper pipe cutter | |||
Side cutters | |||
Needle-nose pliers | |||
Wire stripper | |||
Flat screwdriver | |||
3rd arm jig | |||
Drill | |||
Leather punch | |||
Software | |||
Image burned on the Raspberry Pi 3 micro-SD card | |||
Electrical diagram design program | runs on Linux notebook | ||
Arduino programming interactive development environment | runs on Linux notebook | ||
Video editing software used for promo clips | runs on Linux notebook |
BUILD INSTRUCTIONS
Here's the Fritzing layout of the electrical components. I wasn't able to find a library part file for the 3.5" 480 x 320 PiTFT module, so I simply broke out the cable connections, from the Raspberry Pi to the display with labels.

Pi-to-TFT Screen Cable
The Pi-to-TFT screen cable was fabbed-up by salvaging a 2 x 20 connector from an old IDE hard-drive cable. Take the cable retainer clip off the back and peel away the ribbon cable, being careful not to pull the pins out of the connector. You can then solder solid core 22-gauge wire to the connector pins and route the wires to male push pins that plug into the display's 2 x 20 header. I think the exposed soldered connector, on the front of the Pi, enhances the “engineering” look of the badge.
|
Exposed Raspberry Pi Connector Detail |
|
PiTFT Display Push Pins Detail (back side) |
The Auxiliary Arduino Pro-Mini, Ultrasonic Range Finder, and DS18B20 Digital Thermometer
An auxiliary Arduino Pro-Mini (5V,16 MHz model), connects serially to the Pi through a level-shifter board, to get near-real time readings from the ultrasonic range finder. There's also analog input pins available for as-yet undefined new badge features. The rangefinder will eventually pulse an tri-color LED, in response to how close a person gets to the front of the badge.
|
Badge Reverse Side - Arduino Pro-Mini And Level Shifter Board At Lower Left |
It made sense to connect the Dallas One-Wire DS18B20 thermometer to a Pi digital pin, instead of the Arduino. The DS18B20 requires about 750 ms to take a temperature reading and makes accurate distance measurements with the rangefinder (connected to the Arduino) impossible. The code would have to wait for a temperature, then echo/read the rangefinder, during each program loop. Reading an ambient temperature about once a second is fine using a Python script on the Pi.
Here's some sample Python code to read the DS18B20 digital thermometer, connected to the Raspberry Pi 3.
------------------
import os
import glob
import time
os.system('modprobe w1-gpio')
os.system('modprobe w1-therm')
base_dir = '/sys/bus/w1/devices/'
device_folder = glob.glob(base_dir + '28*')[0]
device_file = device_folder + '/w1_slave'
def read_temp_raw():
f = open(device_file, 'r')
lines = f.readlines()
f.close()
return lines
def read_temp():
lines = read_temp_raw()
while lines[0].strip()[-3:] != 'YES':
time.sleep(0.2)
lines = read_temp_raw()
equals_pos = lines[1].find('t=')
if equals_pos != -1:
temp_string = lines[1][equals_pos+2:]
temp_c = float(temp_string) / 1000.0
temp_f = temp_c * 9.0 / 5.0 + 32.0
return temp_c, temp_f
while True:
print(read_temp())
time.sleep(1)
-------------
Fabbed Brass Tubing Frame/Leather Backing
Some 3/16” thin-wall brass tubing, from a local hobby story, was used to build the frame. Lengths were cut with a standard plumber's copper pipe cutter, available at any home improvement store. Soldering the parts were a challenge. I used “3rd-arm” jigs, alligator clips, wire, tape, and, occasionally, hot glue to hold the parts in alignment while soldering. For thumbscrew attachments points I simply screwed the 1/4” long sections of tubing vertically to a piece of wood, placing them in the desired locations around the frame. Square frame sections were aligned with weights and binder clips, during soldering. Brackets for attaching the auxiliary Arduino, rangefinder, Raspberry Pi, and PiTFT display to the frame were made from 1/4” x 1/16” brass flat stock. Ten-gauge solid copper wire was bent and soldered to the top of the frame for lanyard attachment points.
|
Brass Tubing Frame And Lanyard Hook Details |
An old tried-and-true Weller 100/140 watt soldering gun and 1/16” rosin-cored solder handled constructing the frame without any issues. Fine adjustments in tubing length and corner rounding of the flat-stock brackets is easy with a small abrasive drum, in a Dremel tool. You can also use a medium grit sanding sponge, to knock off sharp edges and smooth out solder joints.
I like the hand-crafted, antique Steampunk look of the brass frame and thumbscrews. You have to be able to take the leather backing off of the frame for modifications and the thumbscrews make that very easy.
Antique Name Plate
A Steampunk conference badge certainly needs a cool looking name plate. After considerable searching I found an appropriate Victorian font and printed the 'Dr Torq' characters on standard laser printer paper. Next, I carefully ripped the paper to the appropriate size and soaked it in a mild instant iced-tea solution for a few minutes. The antique look came from wadding up the paper while wet and then flattening it out on a paper towel and drying it with an electric hair drier. I then used clear nail polish to glue the paper to the small leather name plate. After the “glue” dried, I painted the front of the stained paper with a coat of nail polish to give it a slight sheen. Don't worry about the paper tearing, here and there, because that only enhances the old-timey look of the badge. The leather and paper name plate was then hot-glued to the leather badge backing. I thought the aged effect turned out very well.
|
Dr. Torq Name Plate Detail |
Wrap Up
The badge was a huge hit at a recent conference in Santa Clara, CA. I'd like to use photocells for input, instead of push-buttons, so that might be a possible new feature. It would also be cool to wear the badge around the conference show floor, then simply plug it into a projector to give one of my tech talks. Switching between the 3.5” TFT and the HDMI video output, isn't quite there yet.
I'm happy with the Gen-5 badge and not sure when Dr Torq will be motivated to go to version 6.0. He's a bit eccentric, you know.
Dr. Torq (aka: Rob Reilly) explains the latest, bleeding-edge technology and trends to audiences worldwide, through his widely published articles and in-person tech talks. The trademark Steampunk-themed gadgets, he builds, are insanely popular online, at conferences and at tech events. Visit his website at DrTorq.com. Always interested in new clients, you can contact him via email at [email protected].
About the Author(s)
You May Also Like


