Protect Your Smarts, Build a Smart Motorcycle Helmet
Gadget Freaks Matt Kopper, Karl Akerberg, and Valerie Cochrane show you how to improve upon the typical motorcycle helmet design with some additional smart safety features and touchscreen controls

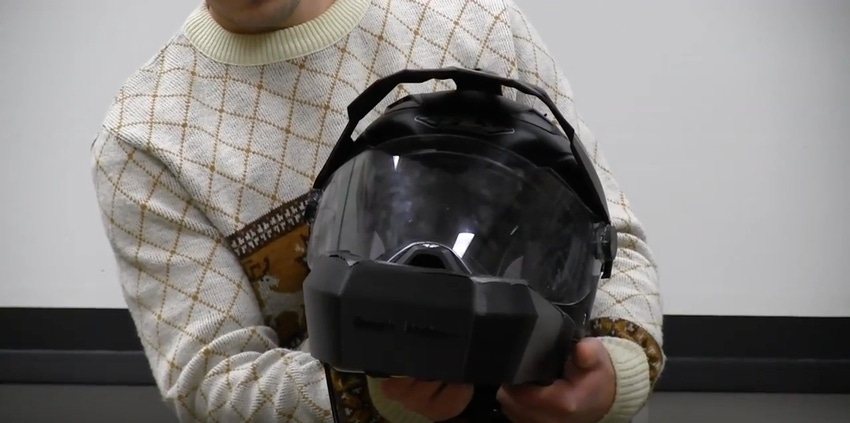
Wearing a motorcycle helmet is a great idea. But a helmet could be so much more. Matt Kopper, Karl Akerberg, and Valerie Cochrane, three students at Colorado State have improved on the typical motorcycle helmet design with a handful of 'smart' features.
To allow better airflow to the wearer the helmet incorporates an LED touchscreen, mounted in the chin, that is connected to two servomotors that allow the wear to control the visor. The screen can also be used to display road maps.
The team also added two additional safety features. The first is a blindspot detection system. This includes two ultrasonic sensors that communicate with two buzzers and two small LED lights, located on the right and left side of the helmet. The ultra sonic sensors are programmed to detect an object in the right or left blind spot. If something is detected in its range (lets say on the right side) then the right ear buzzer will sound along with the light in the lower right of the users peripheral vision lighting up; same goes for the left side.
The other safety feature is an ambient light detection system, where a photoresistor is fixed on the top of the helmet, which corresponds to light or dark. If it detects no light (darkness) four LED lights mounted on the rear of the helmet light up. This allows for riders to be more visible during the night or even on cloudy days.
An Arduino Mega is used to control the touchscreen while a PIC 16F88 is used for the other components on the helmet. Power for the entire device includes eight AA batteries and a small handheld power source.
PLEASE NOTE: This helmet is a prototype project and should not be used on the road or in any live traffic conditions.
Download the Arduino Mega source code
Download the PIC source code
Scroll through for Part List, followed by Build Instructions.
Parts List
Part | Vendor | Quantity |
Fly Racing Helmet |
| 1 |
Arduino Mega - OSOYOO MEGA2560 R3 Control Board ATMEGA2560-16AU | 1 | |
USB Cable | 1 | |
Arduino Mega LCD Shield - Uxcell a 14121800ux0787 | Amazon | 1 |
Connecting Pin wires | 120pcs x2 | |
LCD Touch Screen - 3.2” TFT Touch Panel LCD Display | Amazon | 1 |
Hitec HS-65MG+ Micro Servo | HobbyTown USA | 2 |
Ultrasonic Sensor - Kuman 2pcs Hc-sr04 Ultrasonic Distance | Amazon | 2 |
Portable Battery 5V - Blackweb portable battery for smartphone | Wal-Mart | 1 |
Photoresistor - Arduino Starter Kit | CSU mechatronics lab kit | 1 |
0.1 µF Capacitor | CSU mechatronics lab kit | 1 |
330 Ω Resistor | CSU mechatronics lab kit | 6 |
1 KΩ Resistor | CSU mechatronics lab kit | 2 |
6v Battery Pack (4 AAA Batteries) | Wal-Mart | 3 |
0.1 µF Capacitor | CSU mechatronics lab kit | 1 |
PIC 16F88 | CSU mechatronics lab kit | 1 |
LED lights | CSU mechatronics lab kit | 2 |
Buzzer - Arduino Starter Kit | CSU mechatronics lab kit | 2 |
Breadboard | CSU mechatronics lab kit | 1 |
PLA Plastic 3D Printer Material Spool (Black) | CSU | 1 Kg Spool |
⅛” Shrink Wrap Tubing | Mountain State Electronics | 3ft |
Small Ultra bright LEDS | Mountain State Electronics | 4 |
Small Insulated Copper Wire | Mountain State Electronics | 20 ft |
Bent Right Angle 2.54mm 40 pin Single Row Male Pin Header Strip | Amazon | 5pcs |
BUILD INSTRUCTIONS:

Acquire motocross helmet with built in face shield; preferably with an elongated chin guard.
Rough cut two angled slots in the front of chin guard, where the touchscreen can sit/fit in slots, leaving ample room for wire connections (in peripheral view of user).
Remove helmet foam – apply heat to help with easy removal as well as cut foam in half for easy removal and assembly.
Cut/drill two holes on outer foam surface for motor placement. Located where the helmet visor connects to the helmet.
Drill two holes on the inner foam surface near the ears for the buzzer placement.
Drill hole in the top of the helmet shell for the photoresistor.
Drill out four holes in the side-rear (blind spot locations) of the helmet for ultrasonic sensor placement (two holes on the left and two on the right)
Cut out square area in the rear of the foam, for placement of the breadboard.
Program PIC micro controller for photoresistor and rear lights.

Program Arduino Mega for buzzers, motors, blind spot lights, ultrasonic sensors, and LCD screen.
Assemble circuits on breadboard to ensure correct function (see circuit diagrams).
Connect LCD, motors, buzzers, ultrasonic sensors, and blind spot lights to the Arduino Mega to ensure functionality (see Arduino circuit diagram for wiring)
Once all wiring is correct and functional you can solder connections, or use shrink-wrap between wire connections/extensions.

PIC breadboard circuit, mounted and implanted in the rear of the helmet foam that controls the photoresistor and four back LEDs
Mount ultrasonic sensors in correct holes.
Mount 4 LED lights on the back of the helmet.
Place photoresistor in hole on top of helmet.

This figure just shows the three battery packs that were mounted on the rear of the helmet used to power the servomotors.
Mount yellow LED lights on the left and right side of chin guard for blind spot lights
Place buzzers in correct hole locations.
Push motors in corresponding foam holes, and align the servo gear to the center of the visor screw holes.
Create 3D printed shafts to fit through visor screw holes and glue to outsides of visor. Glue mating servo gear on the inside of the 3D printed shafts to connect to servomotors inside the foam
Mount LCD touch screen in chin slots.


The two images above, show how the touchscreen was mounted as well as where all the wires where taped down on the inside of the helmet.
Place breadboard with PIC circuit into rear foam cut location.

PIC Wiring Diagram
Make sure all wires are secure and taped along the inside of the helmet shell before placing foam fully back in.

Arduino Mega Wiring Diagram
When all wires are secured, and connected to the Arduino Mega, mount/glue 3D printed chin cover.
Carefully secure Arduino Mega and Shield within the remaining chin guard space and secure in place with tape.

Functional Diagram
[All images courtesy Matt Kopper]
About the Author(s)
You May Also Like


