A Motorized Time-Lapse Camera Slider
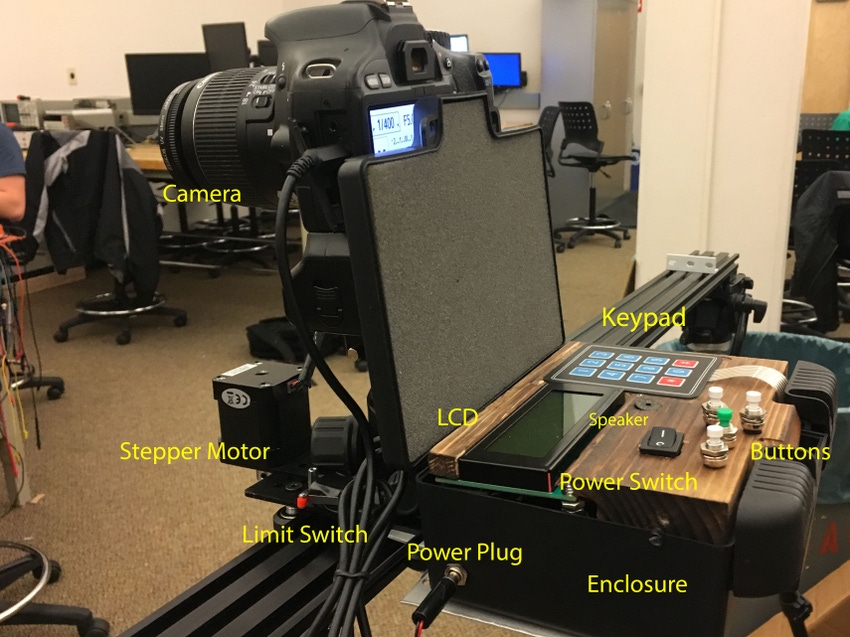
Do you enjoy photography? Maybe you're an amateur or semi-pro. Or maybe you're just looking to create some fancy camerawork. A team of students from Colorado State University teaches you how to build your own Arduino-based automated camera slider for time-lapse photography (camera not included).
March 28, 2017

Do you enjoy photography? Maybe you're an amateur or semi-pro. Or maybe you're just looking to create some fancy camerawork. A team of students from Colorado State University teaches you how to build your own automated camera slider for time-lapse photography (camera not included).
The idea of the project stemmed from a team member’s interest in photography and video and the desire to capture more dynamic time lapses without purchasing an expensive commercial unit.
The goal for the motorized time lapse slider was to create a functioning device that allowed for complete customization in capturing dynamic time lapses. The device was designed to be portable, customizable, modular, and portable – all things a photographer requires in a product. The ability to be customized allows for the use of a wide range of cameras in a wide range of situations. And the modular nature of the device allows a photographer to take photos in any environment while being able to break down easily and reassemble without missing a shot.

In creating this project there were challenges faced in powering the device along with the resulting motor control problems. We tested (and destroyed) multiple motor drivers in testing power options. In the end we determined that the motor driver we selected was not the best option for the motor and battery combination we were working with. A motor driver that could handle more current would have yielded better performance; the Big Easy Driver from Sparkfun (available on Digi-Key) would be a good choice. In the future finding a lighter weight power source will be a necessary improvement in order to improve the portability of the device.
Download the Parts List.
Download the Arduino source code.
Download the Slider source code.
BUILD INSTRUCTIONS:
(Right-click any image to download a larger format version)
Building this time-lapse slider is primarily a matter of assembly should your parts come from Openbuilds.com. These parts interface together very well and leave only a few parts to be machined or built.
Cart Assembly:

One of the few modifications that needs to be made is drilling a 1/4-inch hole in the center of the gantry cart for the tripod head attachment. The cart assembly begins with the assembly of wheels on to the gantry plate. Wheel width depends on the rail width you are working with. When assembling the wheels ensure the eccentric spacers are on the same side of the rail. This allows the cart to be adjusted to create a slop free fit on the rail. In our build, each wheel used a 30mm M5 screw with 3mm spacers.
The motor mount plate is attached to the gantry cart with two M5 screws with a double Tee nut. The NEMA motor attaches with 4 – M3 screws.
The two limit switches were mounted to the gantry using M3 screws and nuts. The limit switch enclosures are cabinet magnet mounts with the magnets removed. The switches can be held in place with hot glue.
The motor wire was shortened up, wrapped in sheathing, and soldered to a mini XLR connector.
Rail Assembly:

To create the tripod mounts for the rail, drill 4 x 5-mm holes 20mm apart widthwise and 40mm apart lengthwise. Counter sink these holes to create a flush fit for the M5 screws. In the middle of the plate drill a hole and tap a 1/4-inch – 20 thread for the tripod connection. Build a plate for each tripod connection, usually only two for the assembly. Attach the plates to the rail by slide 4 –Tee Nuts into the rail’s grove and attach with 4 – 10mm M5 screws.
Next, for the limit switch brackets, repeat the sliding of the Tee nuts into the grooves on the top of the rail and attach with 2 - 10mm M5 screws. Spacers between the screw head and bracket maybe needed to keep the screws from damaging the rail through the Tee nut.
For the belt assembly use one Tee nut to fix the belt, teeth towards the rail, tighten one M5 screw into the Tee nut to hold the belt in place. Then slide the cart on to the rail with the belt between the wheels and rail. Pull belt between the wheels to engage with the gear on the motor. Pull the belt tight to the end of the rail and secure the belt with another Tee nut by pinching the belt between the rail and the Tee nut. Hold the belt in place with one M5 screw.
Electronic Box Assembly:

Internal wiring was done by soldering to protoboard that interfaced with the Arduino. This should be done after preliminary testing on a breadboard. Simple soldering techniques are required to
construct the wiring. The Arduino was secured in places using standoffs screwed to the bottom of the enclosure. The plugs for power, motor control, camera actuation, and limit switches were soldered to the protoboard before being mounted to the enclosure.
The LCD display is soldered to the I2C backpack before being wired in to the Arduino. The button array was simply connect to the Arduino and then stuck to the control panel using the adhesive backing. The control panel was created by cutting out openings in a thin block of wood for the four buttons and LCD display. The panel is secured in place with a screw on either side of the panel, through the enclosure. The enclosure used two Tee nuts and M5 screws to attach the aluminum bracket to the enclosure, and then two more Tee nuts and M5 screws to attach the aluminum bracket and the gantry plate.
| Have your own Gadget Freak project to share? Submit your ideas here. If accepted, it could earn you $500 from Design News and Digi-Key Electronics! |
|
About the Author(s)
You May Also Like


