Look Over Yonder with a Distant Object Detector
Building a security system? Robot? Or maybe you're just curious what's out there. Gadget Freak Sajjad Haidar shows you how to build your own distance object detection system.
July 12, 2017

There are several different ways a remotely (10s of meters or 100s of meters) located object can be detected, or the object’s presence or absence can be ensured:
Sending ultrasonic sound and receiving the reflected sound from the object. Principle used: Time of Flight measurement or TOF
Sending laser or LED light and detecting the reflected light from the object. Principle used: Time of Flight measurement or TOF.
Using a CCD camera, comparing successive images. If there is any discrepancy between two images, there could be something wrong with the object.
Sending pulsed laser light (visible or IR), and detecting the scattered light from the object by lock-in amplification.
There are other methods as well. Each of the above methods mentioned, have some advantages and disadvantages. Considering several factors I decided to work on a project based on the 4th category. The basic block diagram of the project is shown in Fig.1.
An oscillator (~2.1 kHz) drives a laser diode (LD) through a suitable driver and a LD protection circuit. The pulsed laser light is positioned to shine on a part of the remote object of interest. The faint scattered light is detected by a phototransistor, fitted with a 15-cm-long metal pipe (dia. ~5mm). The purpose of this pipe attachment is to make the detection directional. The faint scattered light produces a faint signal at the photo transistor output, which is amplified and filtered (band-pass) to remove unwanted signal and noise to some extent. The signal is then applied to one input of a balanced modulator (AD630). The other input of the balanced modulator (also called the reference input) is fed with the delayed original oscillator signal, driving the LD. At the output of the balanced modulator, a DC level is obtained which is proportional to the signal detected at the photo transistor. Any unwanted signal or noise will be eliminated to a large extent by this balanced modulator. This technique of extracting signal also called lock-in-detection. The output is filtered and amplified further. At the final stage a comparator is used to trigger an alarm. When the object is moved or relocated, the signal goes below a certain threshold level and the alarm sounds to alert.
Here's a video of the project in action:
Click here to download the full parts list.
Build instructions:
|
Fig.1. System block diagram |
Oscillator and LD Driver:
The oscillator used here is based on simple 555 timer IC in astable operation. The circuit diagram is shown in Fig.2. Using a 50 K potentiometer (R8), frequency is set at ~ 2.1 kHz. The duty cycle is ~ 50%. The output of the oscillator is fed to a MOSFET via a buffer (OPA2171), which is driving the LD. The LD used here, is a cheap laser pointer diode with the existing lens of the pointer. While using an LD in pulsed operation, we have to consider its protection as well. Resistor R2 (87 ohms) is used to limit the current within the safe level of ~ 40 mA.
|
Fig.2. Oscillator, LD driver and delay circuit |
A ferrite bead (FB) in series and a ceramic capacitor (0.1uF) in parallel to the LD is used to achieve slow rise and fall time of the current through the LD, some voltage spikes are also removed. As mentioned earlier, oscillator output will also be used as a reference input for the lock-in-amplification. The buffered oscillator output cannot be effectively used directly for this purpose. Because of the LD protection circuit there will be a little delay in turning ON and OFF the LD; also there will be delay in sending the pulses and receiving the signal also known as time of flight (TOF).
|
Fig.3. PCB implementation of the oscillator, LD driver and delay circuit |
At the receiving end, the phototransistor detector output is amplified and filtered, these circuits also introduced some delay. To match with the delayed pulses the reference signal also needs to be delayed. The pulse delay circuit is implemented by an IC, LTC6994. The amount of delay can be adjusted by a 150K pot (R9). Before being fed to the reference input, the DC component of the pulses is removed by a capacitor C3. The implemented PCB is also shown in Fig.3. The oscillator output or the LD driver input and the delayed output waveforms are shown in Fig.4 and Fig.5, respectively.
|
Fig.4. Oscillator and the delayed reference output waveforms |
|
Fig.5. Voltage across the LD |
Phototransistor Amplifier and Filter:
The pulsed laser light is incident on the object to be detected and only a tiny fraction of the scattered light reaches back to the detection system. This scattered light is detected by a phototransistor. The phototransistor is fitted with a metal pipe of 5 mm diameter and 15 cm long to make directional sensing possible. The phototransistor current is amplified by an op amp (OPA2111). Along with the pulsed scattered light from the object, ambient light or background light also generates photo-current. 60 Hz line hum is also present at the amplifier output to a little extent. To remove those unwanted signal and background noise a simple notch filter is used. The passive components are chosen to pass only the pulsed light signal at 2.1 kHz. Other signals and noises are heavily attenuated. The phototransistor and the amplifier-filter is implemented in the same PCB, and put in a small enclosure. The cable from this enclosure carries photo-signal to the lock-in amplifier and power also comes to it from the common power supply. The schematic and the implemented PCB is shown in Fig. 6 and Fig.7, respectively.
|
Fig.6. Phototransistor amplifier and band pass filter. |
|
Fig.7. Phototransistor amplifier PCB, and the enclosure. |
Lock-in Detection Amplifier:
The heart of the detecting system is a balanced modulator, implemented by IC-AD630 and is shown in Fig.8. AD630 has two inputs, we can name one a signal input and other a reference input. The signal obtained from the photo-detector is amplified by IC1A (OPA2171A) and applied to input RINA. The delayed reference signal is applied to the other input SEL. We can either apply to SEL_A or to SEL_B, depending on the polarity of the reference signal. Either of these two inputs is selected by two jumpers. The polarity of the detected output voltage depends on these jumper selectors. As the expected output is of positive output voltage, we can change the jumper position, if we find negative output.
|
Fig.8. The schematic of the lock-in amplifier |
The balanced modulator (AD630) actually multiplies the two input signals and the multiplied result is produced at the output. Only the two signals of exact frequency and phase will produce a DC output, others will cancel out. That is why lock-in detection is a good technique to detect only our desired signal, though very weak in nature.
As the output is a pulsating DC, a passive RC filter consisting of R7 and C9 is used to obtain stable DC, it also filters out any small and fast variation of the desired DC output. Though in the schematic only one value of C9 (10 uF) is given, later it was found that it is better to use several capacitors of different values (1 uF, 10 uF, and 100 uF), one of which is to be selected by a rotary switch.
When the distance of the object goes longer than 100 meters, signal gets weaker and higher value for C9 gives better result. However, large value for C9, makes the response time slower. As the scattered light produces very little signal, the resulting demodulated DC output is also very low, a DC amplifier consisting of IC3A and IC3B lifts this to usable level up to several hundred millivolts to few volts.
Of course, the DC output depends on the distance of the object as well. The further the object the less is the output DC level. This output DC can be seen on a DC voltmeter or on an oscilloscope. The oscilloscope-waveforms of the signal input, reference input, demodulated output and amplified DC output is shown in Fig. 10.
|
Fig.9. The implemented PCB of the lock-in amplifier and the associated input-output terminals and control knobs. |
|
Fig.10. Signal waveforms at various test points of the lock-in amplifier |
To detect the presence and absence of the distant object, it is better to have some sharp indication (ON or OFF) as well along with the DC level measurements. Or in many occasions the sharp detection will suffice. For this purpose a comparator (IC4A) is used at the output of the DC amplifier stage. We can set a DC reference level by a pot in the front panel. Upon receiving a small scattered light by the photo-transistor and going through the all the processes, a DC voltage proportional to the received light is applied at the non-inverting terminal of the comparator.
If the front-panel pot (R11) is now adjusted to little lower than this voltage, the comparator output will be HIGH. If the distant object is removed, the DC signal drops and the comparator output will go LOW. The comparator output can also be used to turn ON an alarm by employing an electro-mechanical or solid state relay.
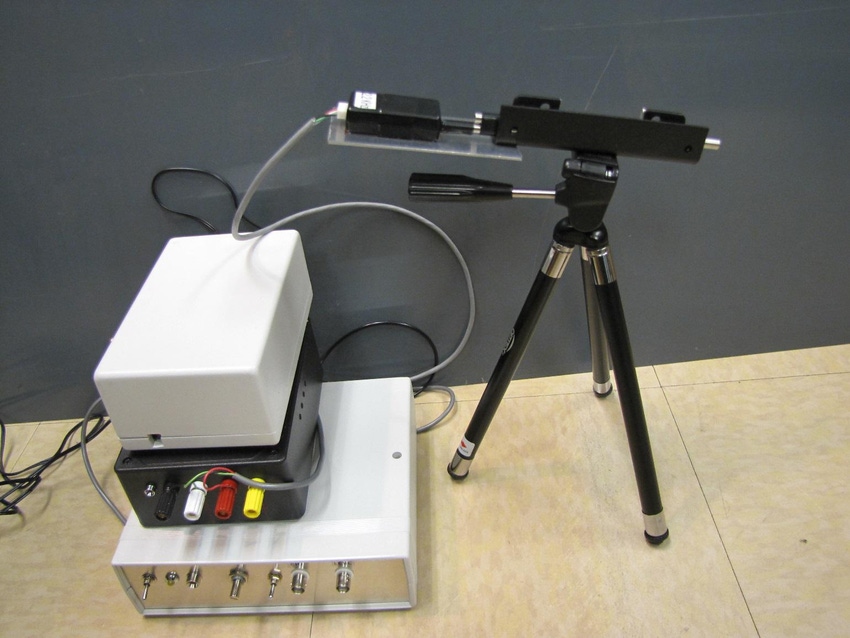
The photograph of the entire distant object detection system is shown in Fig.11. As it is a prototype one, the units are separated for easy testing. The final product could be reduced to one or two units. In this prototype version a camera stand is used to hold the small pipe fitted with the photo transistor. Another pipe of similar size is attached just onto the first one, which serves as a kind of object-sight using naked eye.
Targeting the laser-lighted object through the pipe-hole will give an output signal at TP4, little adjusting the horizontal and azimuth of the tripod, maximizes the signal output. Now controlling the comparator-threshold just below the output level we can make the comparator-output zero, If the object is moved. The detection system is further simplified by removing the pipe positioned in front of the phototransistor, if there is nothing to scatter light behind tens of meters of the object of our interest.
|
Fig.11. The photograph of the distant object detection system. |
About the Author(s)
You May Also Like


.jpg?width=300&auto=webp&quality=80&disable=upscale)

