How to Build a Low-Frequency Theremin With the Evive
The project explores the evive, an all-in-one electronics prototyping device for makers and engineers, by using it to build a theremin.
September 11, 2019

The maker movement has spawned a variety of electronics prototyping platforms like the Arduino, the Raspberry Pi (RPi), micro:bit, and the Circuit Playground Express (CPX). What all of these platforms have in common is their cost effectiveness, high-performance, and that they provide a low barrier to entry to those looking to get into DIY electronics.
But there is another development device that has entered the educational technology and maker product market called the evive. In this Gadget Freak article, the evive we'll be exploring the evive by building a low-frequency theremin.
What is the evive?
|
The evive is an all-one electronics and robotics prototyping and technology learning platform. (Image source: Agilo Research Pvt, Ltd.) |
The evive was created by Agilo Research Pvt, Ltd, an educational technology hardware startup located in Ahmedabad, Gujarat India. The co-founders Dhrupal Shah, Abhishek Sharma, and Pankaj Kumar Verma, are three enthusiastic entrepreneurs and engineers who dreamt of enabling young minds to innovate and create by providing them with world-class technology and learning resources. The evive originated from this vision and provides a wealth of technology resources within a single prototyping platform.
The evive is a palm-sized prototyping platform (115 x 140 x 32mm) used for learning electronics and robotics through constructionism-based projects. The evive weighs 340 grams, including the rechargeable 5VDC lithium-ion battery.
The evive features are inclusive to a traditional electronics and robotics lab and include: an integrated oscilloscope; a function generator and voltmeter for electrical measurement data visualization; an Integrated H-bridge motor driver; two potentiometers; toggle/momentary pushbutton switches; a thin-film transistor (TFT) display; an adjustable 0-+5VDC power supply; and digital-analog converter (DAC).
On top of the evive’s printed circuit board (PCB) is a mini breadboard, dual in line female header connectors for external electronic circuit prototyping and placement of external shields, and external connectors for XBee and Bluetooth communication modules. The core development board that allows these integrated features to work synchronously is an Arduino Mega 2560 (which is based on the ATmega2560 from Microchip Technology). Technology concepts and projects that can be investigated with evive include: the Internet of Things (IoT) the Industrial Internet of Things (IIoT/Industry 4.0); robotics; predictive maintenance; automation; and electronic controls. With the integrated solderless breadboard, General Purpose Input-Output (GPIO), and analog-digital converter (ADC) female header connectors, a variety of external embedded platforms can be included for building proof-of-concept prototypes.
A Low-Frequency evive Theremin
Now that we've gotten our introductions out of the way, let's explore building a low-frequency theremin using the evive.
The theremin is an electronic musical instrument that generates sounds from hand gestures based on their proximity to the instrument's two antennas. The theremin’s electronic oscillators direct the frequency or audible sound based on the thereminist’s hands' distance within the two antennas. A typical theremin’s variable frequency oscillator is in the range of 257 – 260 KHz. The output frequency range of the evive theremin is below 20Hz. Therefore, the audible sound varies between single clock pulses to a solid-state buzzer. The low frequency theremin’s device construction is based on a simple hybrid design consisting of the evive, a light sensor, and speaker amplifier.
RELATED ARTICLES:
Device Design (Block Diagram)
The low-frequency theremin is a hybrid design using off-the-shelf electronic components. The design consists of a photocell (light sensor) receiving ambient light levels at pin A12 of the evive -ATmega2560-based microcontroller. The embedded software residing inside of the Arduino microcontroller’s RAM memory will read the varying light level analog values. These analog values will provide varying flashing rates for the LED wired to pin D13 of the microcontroller. The LED flashing audible output sounds will be heard through the littleBits o26 speaker electronic module.
Here's the complete hybrid design of the theremin:
|
The low frequency theremin consists of off the shelf electronic components. |
Parts List and Device Assembly
The table shown next lists the components for the hand gesture-based control oscillator. Although the table lists specific electronic components for the project, the experienced maker or engineer can use appropriate alternative parts to build the device.
Quantity | Component | Description- Circuit Reference Designator | Supplier |
1 | evive | Electronic prototyping device | |
1 | littleBits o26 speaker | Electronic speaker amplifier module | |
1 | littleBits proto | Electrical terminal block | |
1 | Photocell | Light dependent resistor (PC1) | |
1 | 4.7 Kilo-ohm (KΩ) resistor:(yellow, violet, red, gold stripes) | A fixed-pulldown resistor (R1) | |
1 | 220 ohm (Ω) resistor: (red, red, brown, gold stripes) | A fixed-series current limiting resistor (R2) | |
1 | Light emitting diode (LED) red or alternative color | Audible output visual indicator (LED1) | |
NA | Electrical jumper wires | NA |
|
The littleBits proto-module: (Image source: littleBits) |
The approach behind this design is a physical mashup of different educational technology prototyping and learning platforms. Rapid prototyping using this this mashup method allows makers and engineers to use low- and high-tech development boards and tools to capture specific hardware features.
The design concept challenge of this project is the integration of the evive and the littleBits products to rapidly develop a proof-of-concept audible and visual electronics device. The evive theremin PoC produces low-frequency audible tones based on the physical proximity detection of a hand. The key component to assist in the electrical circuit integration of these different educational technology tools is the use of the littleBits proto module.
|
Pinout of a typical littleBits bitSnap. |
The littleBits proto-module consist of two three terminal blocks and jumpers mounted on a mini PCB. The mini PCB has two plastic bitSnaps that have metal pins for providing electrical connections to adjacent littleBits electronic modules. The electrical connections include: vcc (+5V power supply), sig (electrical signal), and gnd (electrical ground). To reduce error in building a littleBits gadget or device, small magnets are placed inside and flushed with the bitSnaps front surface.
With the proto-module, electrical integration of the evive to the littleBits speaker can easily be accomplished.
Building the Theremin
1.) Wire the light sensor circuit on the evive prototyping device. The light sensor circuit is wired to the evive using the mini solderless breadboard mounted onto its PCB.
|
The electrical wiring of the light sensor circuit to the evive. |
Here is a closer view of the solderless breadboard showing the details of the light sensor circuit electrical wiring of the individual electronic components.
|
Closeup view of the light sensor circuit electrical wiring on a solderless breadboard. |
2.) Next, the light sensor circuit is wired to the littleBits o26 speaker using the proto board.
|
The electronic circuit schematic diagram of the light sensor circuit to the littleBit’s 026 theremin. |
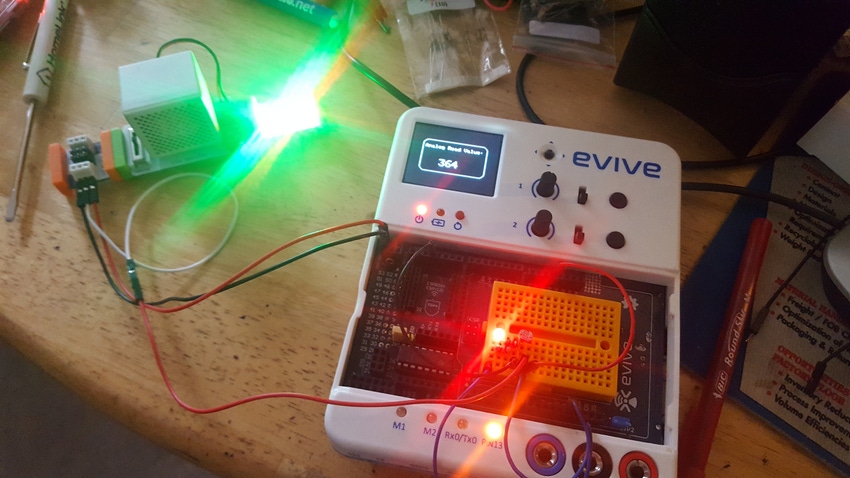
With the electrical wiring completed, the low frequency theremin should appear as shown:
|
The completely built low frequency theremin. |
3.) All that remains in the completing the project is the inclusion of software.
The software is basically an Arduino sketch coded in C++ language for light level detection and flashing the external LED. In addition, the evive’s (TFT) screen displays the varying analog values. With the theremin code uploaded to the evive’s ATmega 2560 microcontroller, the LEDs (external and evive wired) will begin to flash. Adjusting the volume control on the littleBits’ o26 speaker will allow the audible tones to be heard.
You can click here to download the source code as text file.
As an option, a visual stroboscopic effect can be created by adding the littleBits’ LED bargraph. The littleBits bargraph module is electrically and magnetically attached to the 026speaker module.
|
The littleBits o9 bargraph can be added to provide a stroboscopic -visual effect for the low frequency theremin device. |
Additional technical information on the evive can be found on the STEMpedia website.
[All images courtesy Don Wilcher, unless otherwise noted]
Don Wilcher is a passionate teacher of electronics technology and an electrical engineer with 26 years of industrial experience. He’s worked on industrial robotics systems, automotive electronic modules/systems, and embedded wireless controls for small consumer appliances. He’s also a book author, writing DIY project books on electronics and robotics technologies
About the Author(s)
You May Also Like


