How's Your Water Level? Build a Wireless Depth Detector
Here's how to build a wireless water depth detector based off of an Arduino Nano. This project is perfect for anyone looking for a DIY method of monitoring water levels in aquariums, pools, decorative ponds and more with up to 0.05-inch accuracy.
June 7, 2017

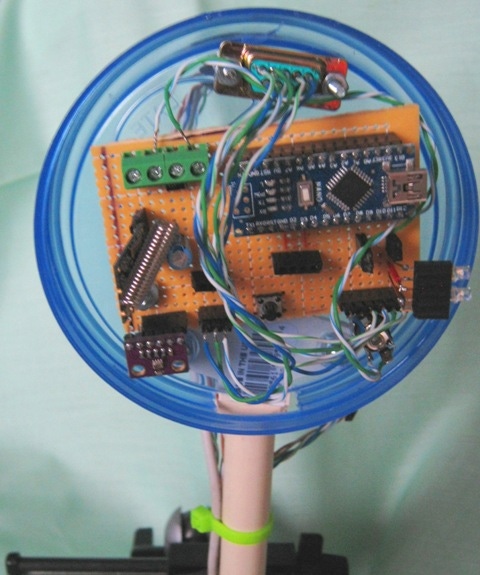
Based on dual BMP280 pressure sensors and a KY-013, water, temperature sensor this project is intended for monitoring evaporative and decorative ponds, creeks or wells. The functionality could also find use in aquariums, hot tubs, or pools. The dual sensor implementation provides accuracy resolution down to ~0.05 inches of water with 0.8% variation per measurement.
|
Referring to the schematic, the Ardurino based controller is also fitted to an HC12 serial link to provide remoted monitoring |
PARTS LIST:
Generic Name | Description | Quantity | DigiKey Part Number |
Arduino Nano |
| 1 | |
10K resistor |
| 6 | |
4.7K resistor |
| 2 | |
510 resistor |
| 2 |
|
5.1K resistor |
|
|
|
22uf 25V Pw CAP |
| 1 | |
1N4001 Diode |
| 1 | |
HC12 Serial Transceiver |
| 1 |
|
BMP280 Pa Sensor |
| 2 | |
0.1" Row Connectors |
| 23 |
|
0.1" Header pins |
| 18 | |
Screw Terminal pins | 4 position | 1 |
|
5mm Barrel Power Conn | Specific, dependent on mating male plug | 1 | |
1N4148 Diode |
| 2 | |
White LED |
| 2 | |
Button Switch | Momentary | 1 | |
KY-013Temp Sensor | req code change(non Stock substitute) | 1 | |
|
|
|
|
BUILD INSTRUCTIONS:
The coded processes monitor both the barometric and sensor pressures, allows for a base level configuration, high and low set points, and facilitates an LED display with trips points and a a related alarm with override.
Both the barometer re-test and wireless report can be independently scheduled in durations of 1 to 655535 seconds.
Using the BMP280 sensors together allows for water level measurement accurate down to fractions of an inch and has the happy bonus of cost less than $2. The second sensor (S1) adjusts for atmospheric barometric pressure variation.
Using the "SparkFunBME280.h" library functions and services produces readings for temperature, absolute pressure, and an altitude reading from the pressure and temperature measurements done on the sensors. Altitude is not used in this application.
The HC12 is a hundred-channel, 433-MHz based, serial transceiver link and is configured to produce the maximum of 20dBm transmit power. It's configurable for a number of scenarios and provides up to 1000m for a reasonable $4-5. This wireless link is shared with the Arduino Nano’s serial USB.
 A series of operational parameters, shown below, may be then configured and updated, as required, over either of these links. Any non numeric entry evokes the 4 parameter, System parameters list shown.
The report, shown below, is then available as parameter 2 , on other the connected USB port or on a remote receiver terminal configured with same channel and rate settings.

Bluetooth may also be configured onto the project, although with the controller at about 70% and memory is 46% used, additional coding for a WIFI link and interface could get the data to a Thingspeak or other Internet accessible resource. The schematic reserved pins 8 and 9 pins for an 8266 based WiFI. The code, while available, is not included in the app.
 The Operational parameter list, taken from the System list, parameter 3, provides a series of variables that are maintained in EEPROM and loaded at power up.
These include Pa/in setting, parameter 7, which is a calibrated value that is required to convert the detected sensor pressure to units of mm or inches and is defined initially as 249.1. This parameter is also a function of the geometry and construction used to form the sensor tube. Calibration maybe done by with both baro and detector sensors exposed to the atmosphere, at their operation levels(attitudes).
Once the device is powered on the code will configure the sensors and evaluate and store the current differences between the sensors and the report will follow. Submerging the end of the open tube into a known level of water, read the delta value provided in the resulting report. Divide this by the number of inches or mm used in calibration: (value). Request the services display (any non numeric character), select the Parameter list using: 3$ and, following the parameter display, type: 7$(value)$ and return. For the project specifics shown I found the value was 235 worked for me. Roughly, this is taken as: 249.1(Pa/in)//(diameter Sensor chamber/diameter tube). This establishes the end of the tube to be the measurement base at 0 in. or 0 mm. This application used CPVC ½” tubing and other materials.
|
The coded processing uses both, selected, oversample and filter characteristics provided within the sensor. All the parameters in the list of variables are ‘link’ accessible and are (re)stored in EEPROM.
The tube assemble, open at the bottom, MUST BE sealed, with no opportunity for air to leak out of the top of the un-exposed upper portion of the tube. The pressure in the tube reflects the water height and any leak will eventually be reflected in the result report.
A logger handshake pin, using a simple sequence is also coded into the controller. When matched with a SD-based fixture the report is synched by this handshake.
 Configuring this app with the second pressure sensor allows consistent water height measurement without concern for variation of barometric pressure. Using a differential pressure sensor is another option, of course. Given their cost, eg: MPS20N0040D and including any additional analog filtering and gain requirements, the provided dual sensor approach reduces the part counts and cost. Sensitivity(40KPa), hysteresis errors and operation in an outdoor weather environmental, for the differential sensor may also be important design issue for their use.
The BMP280 implementation will also report a vacuum, allowing additional applications to be considered. A new calibration procedure may be required and the conversion factor may need to be reset.
A water temperature sensor was integrated into the Arduino Nano and uses a KY-013 bead (module). This my be easily replaced/re-coded for use with a DS18B20 sensor. For the water temperature sensor, parameter 10 is provided as a simple offset, applied to the reported WTemp result.
 If desired, either pressure sensor can also give ambient air temperature, but this is not included in the code. The BMP280 pressure and temperature sensor readings are both factory calibrated.
Other features include a trip set momentary ‘button' that establishes the alarm’s reference level. The monitor displays offset height. Parameters 5 and 6 will also set the alarm and LED indicators when above or below this monitor set point. Parameter 9 can be used to set the trip value over the USB or wireless link. The wireless link can be, optionally, deleted, without any change, as well as the use of the logger handshake.
Please note, the BMP280 may be damaged if powered from voltages higher than 4.25 V. The current requirement, being relatively small, allows the Ardurino Nano’s 3.3-V pin to be used to provide this power.
Configured as a differential sensor (water pressure referenced to atmospheric pressure), the BMP280’s 110000-Pa range limits the depth that can be detected to the specifics of referenced barometric pressure. At sea level you would only be able to detect up to ~34.8 inches ((110000-101325)/249.1). At 5000 ft this is improves to ~103.6 inches ((110000-88200)/249.1).
 The Nano controller may need to be modified based on the manufacturer. The controller RCV pin was pulled up and also providing power for the RCV LED, driven by a 1K resistor from the on–board FIFO. I found the HC12 serial TX pin output would not drive the RCV pin of the controller low enough. The app description uses a wired OR configuration and would require a diode be substituted/inserted in series between the FIFO TX and controller’s RCV pin. Alternately the non-inverting driver, also described below, may be used by the HC12, to assert the RCV pin down low enough to meet the controller’s low level input requirement.
 Lastly, system parameter 4, Psswd, is a single character ‘key’(ascii:0 - 255) and is a place holder to be used if an encryption sequence is supported. There are several ways and level of encryption schemes conceivable. A shorting header allows the app to be behave as an open link or as a closed link requiring a corresponding encryption source to be used to configure parameters. There is a decryption’ service coded into the application, but it is not used and no ‘encryption’ is included for the report data. A central multi-link transceiver with encryption services will have to wait for another project.
2017 Call for Speakers Smart Manufacturing Innovation Summit at Atlantic Design & Manufacturing. Designed for industry professionals looking to overcome plant and enterprise-level manufacturing challenges using IT-based solutions. Immerse yourself in the latest developments during the two-day, expert-led Smart Manufacturing Innovation Summit. You'll get the latest on the factory of future including insights into Industrial IoT and IIoT applications, predictive maintenance, intelligent sensors, security, and harmonizing IT/OT. June 13-15, 2017. Register Today! |
[All images courtesy William Grill]
About the Author(s)
You May Also Like


.jpg?width=300&auto=webp&quality=80&disable=upscale)

