Electromagnetic Ring Launcher -- Building a Science Museum Classic
The Jumping Ring or Electromagnetic Ring Launcher experiment is a staple of science museums and physics class rooms. Here's how to build your own right in your home.
November 21, 2016

There's a very common demonstration in science museums and physics-classrooms called the “Jumping Ring” or “Electromagnetic Ring Launcher." The experiment involves a several centimeters long cylindrical iron core inserted in a large solenoid and a copper ring runs through the extended iron core. When the solenoid is powered by the AC mains, the ring jumps out of the core.
 There are various reasons for the experiment being so popular and so significant in science and engineering. Firstly, it is interesting to observe a metal ring jumps out or hover. Secondly, it utilizes Faraday’s law of induction, Lenz’s law, mutual inductance, and forces due to electromagnetic induction to make it possible for the ring to hover or jump. The main problem with this type of conventional ring launcher is its bulky size and weight, as it requires a large number of turns of thick copper wire for the solenoid and heavy iron core inside. Furthermore, as it operates at the mains-line voltage (115 V or 230 V, AC),it is not safe to operate. Calculations show that the launching of the ring is many times more efficient at frequencies several times higher than that of the AC mains (50/60Hz).
In this project I used a square wave generator of adjustable frequency from 700 Hz to 18 kHz employing a 555 timer IC; the output of which drives a power MOSFET. The MOSFET drives a small coil of ~50 – 60 turns wound on a 10 cm long ferrite cylinder instead of an iron core. A copper ring is placed through the extended part of the ferrite cylinder. A 16 micro Farad film-capacitor is placed in parallel with the coil to achieve parallel resonance. At resonance the current through the coil can be achieved several times higher than that is supplied by the power source. Using a thick copper wire (AWG #14) for making the coil, the coil-resistance is lowered, which makes the quality factor (Q) of the coil high. High Q of the coil maintains nearly ~ 8 times higher current than the power supply can provide. The high primary current is essential to induce high current in the coper ring, the interacting field makes the ring levitate. The circuit needs only 24V DC do levitate, hover and shoot the ring. A 10-Ohm resistor is used in series with the 24V power supply, as the frequency of the oscillator is slowly increased, supply current goes down gradually. At resonant frequency supply current reaches to minimum, (~1.2 A), and also at this point the copper ring levitates and hover midway on the extended ferrite rod. Another switch is used to short the 10-Ohm resistor, when it is shorted, the ring jumps few centimeters out of the rod. Now, keeping the 10-Ohm resistor shorted, if the power supply is turned ON, the ring jumps tens of centimeters above the rod. This video shows these effects.
Full build instructions and parts list continue below:
The circuit:
The circuit consists of a square wave oscillator implemented by a 555 timer IC, a power MOSFET and a MOSFET driver circuit (Fig.1). The circuit needs two power supplies, a 15V, 0.8A supply to deliver power to the oscillator and MOSFET driver and a 24V, 4A supply is powering up the coil.

Fig.1. Circuit diagram of the ring launcher
To achieve near-50% duty cycle resistor R1 is chosen 180 Ohm, which is a much smaller value compared to R2+R7 (minimum~4.7k). By varying R2 from 100K to 0 Ohm, square wave output is obtained from 700Hz to 18 kHz. This square wave output at pin-3 of 555 timer IC should not be used directly to drive the MOSFET (Q3), for the gate capacitance. A MOSFET driver is implemented using two transistors, Q1 and Q2. To limit the initial high gate current, R5 is used. A high power and high current MOSFET (Q3) is used to drive the coil-capacitor combination. A fast recovery diode, D1 is used to leave the LC circuit to run free during the OFF time of the MOSFET. An inductor of 5 micro Henry (L1) is used to limit the initial high current, when the MOSFET is switched ON. This L1 can be made easily by winding ~40 turns on a piece of plastic pipe of 1cm diameter. When the MOSFET is ON energy is delivered to the LC circuit, when the MOSFET is OFF, the stored energy in the capacitor C and coil L begins to flow in-between L and C.
When the switching frequency of the MOSFET matches the resonance frequency of the LC circuit, minimum energy is used by the LC circuit to sustain the oscillation. In this situation, though low current is drawn from the supply, much higher current flows in the LC circuit. This high current creates intense magnetic field in the ferrite core. The copper ring which runs through the core, acts as a single turn coil of low resistance. The alternating magnetic field in the ferrite core induces a voltage in the copper ring, thereby high current flows through the ring as well. These two interacting field forces the ring jump out of the core. The MOSFET Q3 and diode D1 gets heated after sometime of operation, especially during tuning. Two small heat sinks are needed for these two devices. The PCB layout of the circuit is shown in Fig.2. The 10 Ohm power resister (R8) is not shown in the PCB, as it is a panel mounted type. R8 should be screwed to aluminum enclosure as shown in Fig.3.

Fig.2. PCB Layout

Fig.3. Circuit-PCB inside enclosure

Fig.4. Front panel
The Coil with Ferrite Core:
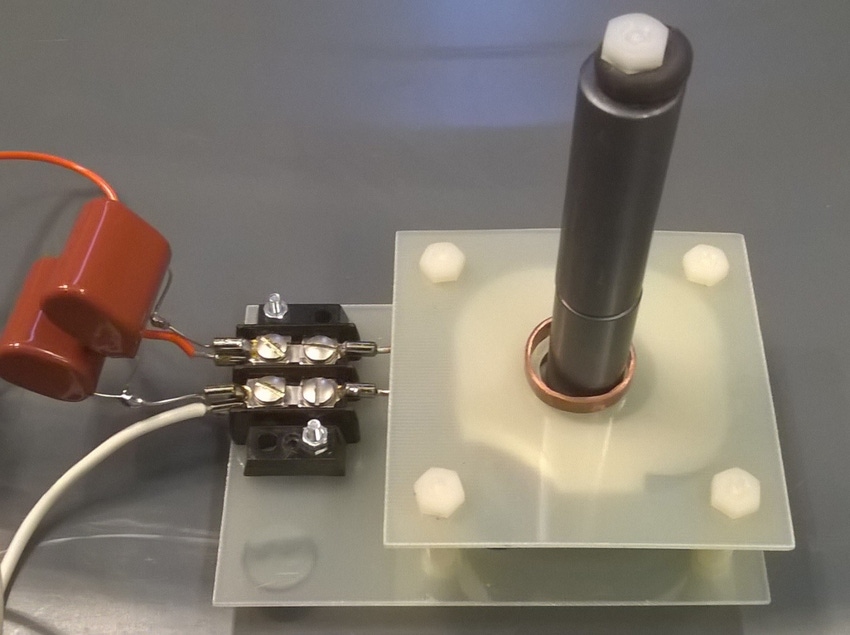
To make a suitable coil holder and a base for the ferrite cylinder, uncladed FR4 sheet was used. Several pieces were cut and screwed as shown in Fig.5. On the top piece, a hole was made for the ferrite cylinder to go in. As long ferrite rods are becoming uncommon now a days, instead two ferrite cylinders with hole inside were used. Each cylinder is 5 cm long, these are joined by a long nylon stand-off and nylon screws. After the coil is made its inductance and resistance were measured using LCR meter. Two ~8 micro Farad capacitor were paralleled to make ~ 16 micro Farad and the combination was connected in parallel with the coil. Now the resonance frequency can be calculated using the well-known formula:

Resonance frequency can also be measured using an oscilloscope and a function generator. This procedure can be found many places in the net.
Detailed specifications are given below.
Diameter (coil former): ~27 mm, length: 16 mm, number of turns, N: 50 ~ 60, wire size: # 14 AWG. Ferrite cylinder of diameter ~16 mm was inserted through the coil (two cylindrical ferrite rods were attached using nylon screws and stand-offs). Measured inductance is ~ 110 mH ( ~235 mH, with the ferrite core inside). Measured resistance ~ 0.1W, with C = 16 mF measured resonant frequency, fr ~ 2.6 kHz

Fig.5. Coil with 16 micro Farad capacitor in parallel. A copper ring is shown through the extended ferrite cylinder.
The whole system consisting of the boxed circuit-PCB, power supplies and the coil; which is shown in Fig.6.

Fig.6. Photograph of the complete system
Test Procedure:
To set the condition for optimum operation, the coil-Capacitor circuit should be set at resonance. Without using any expensive equipment, we can easily make sure of this condition following the block schematic as shown in Fig-7.

Fig.7. Setup for resonance
Before connecting the 24V supply we have to make sure that the 10 Ohm resistor-shunt-switch (S2) is open. Now connecting the 24V supply to an Ammeter in series with the circuit, the potentiometer R2 is slowly turned from high to low, which causes frequency to go from low to high. As the frequency goes up the current goes down and we can see the ring starts to levitate. At resonance, the current goes to the minimum at ~ 1.2 A. At the resonance, the copper ring levitates ~2 cm above the coil. Now if the 10 Ohm resistor is shorted by closing S2, the ring jumps out of the ferrite rod. Keeping the switch S2 closed, if power switch S1 is turned ON from OFF, the ring jumps tens of centimeter above the rod. All of this tests are shown in the video. The circuit can be even run at voltages higher than 24V. If driven by 48V, even much higher jump is seen.
Oscilloscope waveforms are shown in Fig.8 when the coil is at resonance.

Fig.8. Waveforms at the MOSFET Gate, Drain, Coil-high side and across coil, when the coil is driven at resonance.
Parts List
Part | Value | Description | Allied Part # |
C1 | 0.01u | Ceramic Capacitor | 70079249 |
C2 | 0.1 uF | Ceramic Capacitor | 70095155 |
C3 | 0.1 uF | Ceramic Capacitor | 70095155 |
C4 | 0.1uF | Ceramic Capacitor | 70095155 |
C5 | 0.1 uF | Ceramic Capacitor | 70095155 |
C6 | 100uF | polarized capacitor | 70187892 |
C8 | 100uF | polarized capacitor | 70079479 |
D1 | FFPF30UA60S | Fast RecoveryDiode | 70078639 VS-15ETH06FPPBF |
D2 | 18V | Zener Diode | 70061620 |
IC1 | NE555N | Timer IC | 70550780 |
L1 | 5uH | Inductor | ~ 40 turns on 1cm dia. plastic tube |
Q1 | 2N2222 | NPN transistor | 70725575 |
Q2 | 2N2906 | PNP transistor | 70348161 |
Q3 | TK32E12N1 | Power MOSFET | 70017262 (equiv IRFB61N15DPBF) |
R1 | 180 Ohm | Resistor, | 70024696 |
R2 | 100K | Potentiometer | 70153741 |
R3 | 1k | Resistor | 70648011 |
R4 | 4.7 Ohm | Resistor | 70023927 |
R5 | 10 Ohm | Resistor | 70183308 |
R6 | 20k | Resistor | 70183654 |
R7 | 4.7K | Resistor | 70650980 |
R8 | 10 Ohm, 25W | Power Resistor | 70201458 |
2-pin Terminal, 4 pcs | 70086275 | ||
Heat Sink – 2 Pcs | 70115166 | ||
PS1 | 15V, 800 mA | Power Supply1 | 70231086 |
PS2 | 24V, 4.5A | Power Supply 2 | 70177388 |
S1 | ON/OFF | Switch | 70192043 |
S2 | ON/OFF | Switch | 70192043 |
L | ~238 uH | Coil with ferrite core | |
C | 8.2 uF + 8.2 uF | 2 capacitors paralleled | 70260082 |
Binding post (Red) 2pcs | 70210915 | ||
Binding post (Black) 2pcs | 70198054 | ||
BOX | 70148724 | ||
Ferrite Cylinder – 2 pcs | Fair-Rite #2643625202 |
Other items those needed for the project are, screws, nylon screws, hook-up wire.
About the Author(s)
You May Also Like


