DIY Casino Night with a Homemade Lotto Machine
Here's how to make a lotto machine for jumbling raffle tickets using only an Arduino and a simple motor.
December 12, 2018

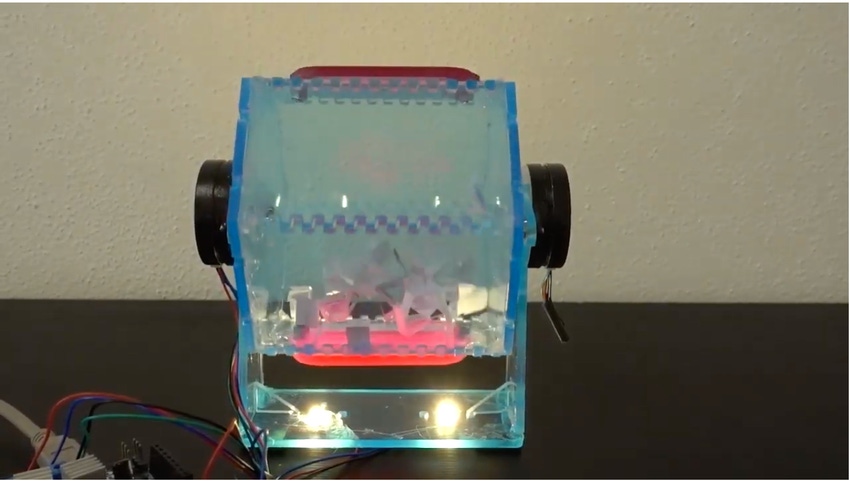
Arduino boards are good for many things...and gambling is among them. Using an Arduino Uno, a simple stepper motor, and some plexiglass, you can create a lotto sorter for jumbling raffle tickets or other small items. It's the perfect DIY addition to your casino game night or bingo event.
Click here to download the source code and DXF files.
Parts List
Qty. | Part |
1 | Arduino Uno |
1 | Adafruit MotorBoard v1 |
1 | Stepper motor 14HR05 |
2 | 3 mm LEDs |
4 | M3x6 screws |
4 | M3x4 rib screws |
4 | 5 x 5 mm magnets |
1 | 3-mm thick Plexiglass sheet |
1 | Hot-glue gun |
Build Instructions:
1.) The plexiglass frame can be machined from the downloadable DXF files using a laser cutter or CNC. The plexiglass should be 3 mm thick and the pieces cut to the following sizes:
Base Below =1pz
Side_Stepper_14HR05 = 2pz
Side_A = 2pz
Side_B = 2pz
Side_C = 2pz
Side_D = 4pz
Side_E = 2pz
Side_F = 2pz
2.) Now, we have to screw the “Side_Stepper_14HR05” to “Side_A” with two M3x6 screws.
Repeat the same on the other end.
3.) After we have finished, we take the piece “Side_C” and use the hot-glue gun to attach it to the bracket of “Side_Stepper_14HR05.”
Repeat the same on the other end.
4.) Now, take the piece "Side_D" and try to fit it into the hole of "Side_C" and hot glue it in place. Repeat the same on the other end.
After you have done two in a row, take the piece "Side_E" and fix two M3x3 screws into the holes so that you can attach a magnet.
After you continue to stick on the "Side_C" with the hot-glue gun, continue as from the beginning until you have all the pieces tied together.
5.) On “Side_F,” place the magnet (5mm x 5mm) so that it sticks to the M3x3 screw of "Side_E." Repeat the same on the other end.
6.) "Side_B" is mounted at the end of the assembly and fits onto the "Base Below" section. Both of these are then fixed onto “Side_A.” Repeat the same on the other end. Hot glue the pieces into place after all the pieces have been fitted.
Use the hot glue gun to attach the LEDs to the “Below Base” section.
7.) Finally, attached the Arduino Uno and Adafruit MotorBoard to the “Below Base” section.
Now, bring the four LED cables in for the MotorBoard by laying them out (the pins are pin 5, pin 6). They also carry the motor cables and they attach themselves on the MotorBoard after we have attached all of the cables to it. After that, fix the Arduino Uno on top.
Loading the downloadable firmware will allow the Arduino to run the lotto machine.
[Image courtesy Davide Marin]
About the Author(s)
You May Also Like


