Using Raspberry Pi Pico W For a Bluetooth Low-Energy Application
Here’s how to develop a low-energy solution using Visual Studio Code and the latest Raspberry Pi Pico SDK toolchain.
August 31, 2023

With the advent of version 1.5.1, the Raspberry Pi Pico SDK now supports Bluetooth Classic and Bluetooth Low Energy (BLE) on the Raspberry Pi Pico W development platform. As expected, following the announcement of Bluetooth support, a number of Pico Bluetooth examples based on a port of BlueKitchen’s BTstack became available. The Raspberry Pi Pico SDK ported example code retains the original BTstack C language format. However, most of the BTstack-based Pico Bluetooth examples that can be found in the public domain have been realized in MicroPython or Arduino. With that, the object of this discussion will be to produce a working C-language Pico Bluetooth Low-Energy example developed under Ubuntu 22.04 LTS using Visual Studio Code and the latest Raspberry Pi Pico SDK toolchain. You can obtain the example project source code from the EDTP Electronics download site.
For those of you who may not be familiar with the Raspberry Pi Pico W, the PicoW is a basic BLE hardware implementation consisting of a microcontroller overseeing the transmission and reception of Bluetooth radio traffic via a Bluetooth radio module. The microcontroller is governed by a Bluetooth stack; the inclusion of a Bluetooth stack allows the PicoW hardware to assume the role of client or server in a Bluetooth application. Thus, the PicoW can be programmed to act as a remote data collection device servicing sensors or a data store-and-forward device that collects sensor data from remote devices and transfers the collected data to a central processing location. The PicoW hardware is also capable of operating in stand-alone mode processing incoming Bluetooth information and acting accordingly via its bank of GPIO pins and on-chip peripherals.
Start With the Firmware
We begin the firmware development process by installing version 1.5.1 of the Raspberry Pi Pico SDK. Raspberry Pi Pico SDK and GNU toolchain installation instructions for Linux can be found on the Raspberry Pi website. The next step involves the installation of Visual Studio Code. For Ubuntu 22.04 LTS, we want to download and install the Debian version of Visual Studio Code. Installation of Visual Studio Code can be performed using the Ubuntu 22.04 LTS built-in Debian application installer.
Following installation, Visual Studio Code requires some customization. To support the compilation process, we must install Visual Studio Code extensions CMake Tools, which also installs the CMake extension, and Serial Monitor. For a successful compilation, CMake must know where the Raspberry Pi Pico SDK is installed. The absolute Raspberry Pi Pico SDK location is identified by the Cmake:Environment setting PICO_SDK_PATH, which we manually enter in the CMake Tools extension settings. We are running the Raspberry Pi Pico SDK and associated toolchain under Linux. So, we must also enter Unix Makefiles in the CMake Tools Cmake:Generator settings field. That’s it. Visual Studio Code is ready to use.
The Raspberry Pi Pico SDK utilizes Python and PyCryptodomex to build a binary database image of the Bluetooth Services and Characteristics that must be included within our Bluetooth application source code. Python is installed with the Ubuntu 22.04 LTS package. We must manually install PyCryptodomex. The installation of PyCryptodomex is performed using the standard Ubuntu sudo apt install process. Detailed PyCryptodomex installation instructions can be found on the PyCryptodomex documentation web page. With the addition of PyCryptodomex to our Raspberry Pi Pico SDK toolchain, we are now ready to begin coding our Raspberry Pi Pico W BLE application.
 Coding With Raspberry Pi Pico W

Our BLE application will be based on the Raspberry Pi Pico SDK’s nordic_spp_le_counter example. The nordic_spp_le_counter example is a look-alike version of the Nordic NUS (Nordic UART Service). The Nordic NUS allows BLE devices to communicate using Bluetooth as if a UART were present on both sides of the communications link. The Raspberry Pi Pico SDK nordic_spp_le_counter example is actually a copy of the BTstack example of the same name. You will not find the complete block of nordic_spp_le_counter example source code in the Raspberry Pi Pico SDK directory tree. So, we will use the BTstack nordic_spp_le_counter example source code as a template for our firmware build.
The nordic_spp_le_counter gets its NUS look and feel by employing identical copies of the original 128-bit NUS Service and Characteristic UUIDs and API calls contained within the BTstack file nordic_spp_service_server.c. We will manually create a file called picow_nus.gatt in which we will place the 128-bti NUS UUIDs. The NUS UUIDs will be used by a Python script (compile_gatt.py) in the compilation process to generate an attribute (ATT) database, which will end up as an array called profile_data that resides within a compile_gatt.py-generated file called picow_nus.h. If you take a look at the picow_nus.h file contents you will also find attribute handle definitions for the NUS Service and Characteristic UUIDs. In this case an attribute handle is nothing more than a 16-bit number that identifies the particular Service or Characteristic value. The attribute handle values are used in the nordic_spp_service_server_init API call. The generation of the NUS attribute database and the picow_nus.h file is governed by the contents of the CMakeLists.txt file.
Our nordic_spp_le_counter example is running as a BLE server. The BLE client is in the form of an application called LightBlue, which is running on an Android phone. The BLE server application is composed of an advertising component, a heartbeat timer module, and a couple of packet handlers. The Raspberry Pi Pico W’s UART0 will be enabled to drive the Visual Studio Code Serial Monitor extension.
The BLE server application flow begins with the initialization of the Raspberry Pi Pico W’s CYW43 BLE radio driver. If the CYW43 driver successfully brings up the BLE radio, the L2CAP (Logical Link Control and Adaptation Protocol) and SM (Security Manager Protocol) BLE stack layers are initialized. The next step sets up and registers the packet handler (stack_event_packet_handler) that monitors the events returned by the Bluetooth stack. The stack_event_packet_handler is fired when the Bluetooth stack comes online and when the BLE client disconnects from the BLE server. With the exception of the connection status LED on/off control byte within the stack_event_packet_handler, the functions provided by the stack_event_packet_handler are purely informational. Following the registration of the stack_event_packet_handler, the ATT server is initialized using the ATT database information contained within the profile_data array, and any ATT server-related events are directed to the stack_event_packet_handler. Before we give the command to activate Bluetooth, the nordic_spp_packet_handler must be registered to monitor events and data passed to and from the nordic_spp_service_server API. At this point, we are ready to activate the 1000 mS heartbeat timer, power up Bluetooth, and start advertising. If everything goes as planned, the connection status LED will begin to blink in 1000 mS intervals.
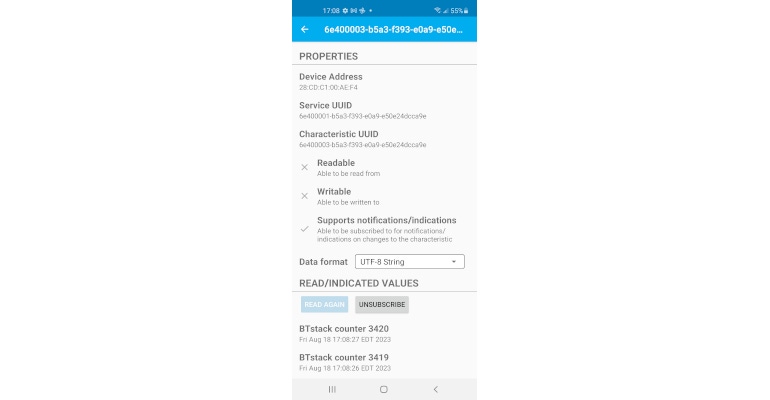
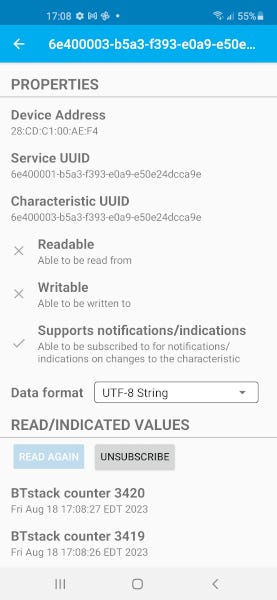
The PicoW is programmed to act as a BLE peripheral device. Before a connection is established, a BLE peripheral device broadcasts information describing itself using a method called advertising. The LightBlue application assumes the BLE central role. A BLE central device scans for BLE peripheral advertisements and uses the advertisement data to decide whether to connect to an advertising BLE peripheral or not. The advertisement data includes the local name PicoW, which will appear in the scan list of the LightBlue application. In this case, the decision to connect is left to the human operator. We will force the BLE central device via the LightBlue application to connect to the PicoW BLE peripheral device. After connecting to PicoW, tap on the Notify characteristic. A new screen will appear allowing you to select the Data Format and Subscribe to the count data being transmitted by the BLE server (PicoW). Choose UTF-8 String as the Data Format and tap Subscribe. The connection status LED will stop blinking and go solid ON. You will see “BTstack counter xxx” in the READ/INDICATED VALUES area of the screen with xxx being a numeric count value. Attach the Pico W’s UART pins to your personal computer using an FTDI USB-to-Serial cable and run Serial Monitor from within Visual Studio Code. Choose Port /dev/ttyUSB0-FTDI and set the baud rate at 115200. You should see “SEND: BTstack counter xxx” scrolling in the Serial Monitor window. You can also send data to the BLE server by choosing the Writable characteristic and entering your data to be transmitted in the WRITTEN VALUES area. If you choose to send in hex format, you will see the data you sent to the BLE server display as “RECV: xx xx” in the Serial Monitor window, where “xx xx” is the hex data you entered to be transmitted.
The nordic_spp_le_counter example can be adapted to be used for remote control, data logging, and remote monitoring. You can also replace the LightBlue BLE client with your own Android BLE client application.
About the Author(s)
You May Also Like


