3 Tips for Rapid Prototyping with the Raspberry Pi Pico
The Raspberry Pi Pico opens a wide range of development options at a low cost. That makes it interesting for developers and makers.
January 23, 2022

Over the last several years, Raspberry Pi’s have proliferated into all sorts of applications. As a microcontroller-focused embedded software consultant, I’ve always found them fun and interesting, but not exactly my cup of tea. However, in January 2021, the Raspberry Pi Pico was released which at its heart has an RP2040 dual-core microcontroller based on the Arm Cortex®-M0+ architecture. So far, the Pico has proved to be intriguing, and in this post, I’ll share three tips for rapid prototyping with the Raspberry Pi Pico.
Tip #1 – Prototype with the Raspberry Pi Pico Module Board
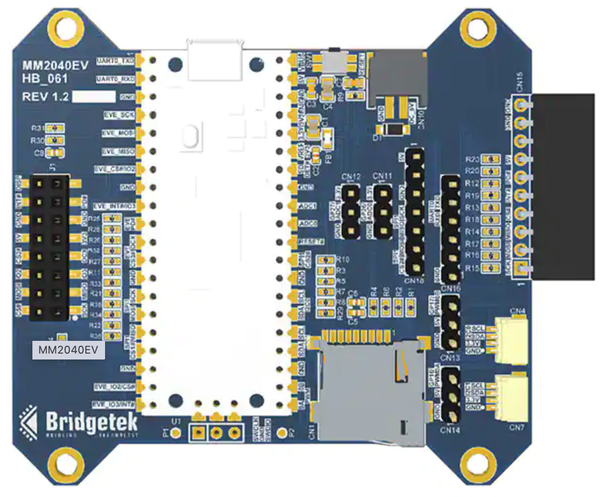
The Raspberry Pi Pico is only around $4. The Pico can be soldered onto a carrier board or headers can also be soldered on for use with a breadboard or wire-wrapping (gasp! Does anyone still do that?). However, if your prototyping and playtime are short, or you want to be efficient, I’ve found that using an existing prototype board can be helpful. I’ve settled on the Bridgetek Raspberry Pi Pico Module board which provides a Pico already soldered to the board along with expansion headers, an SD card slot, and a handy reset button.

The nice thing about a carrier board is that it’s easy to jump things in and out without having to waste 30 minutes to fire up the soldering iron and solder a bunch of headers into place. (Well, it’s probably only 5 minutes but email, phone calls, and social media can be so distracting).
Tip #2 – Use the MicroPython SDK
The Raspberry Pi Pico has two different SDKs that developers can choose from. First, there is a C SDK that allows the use of C and provides all kinds of useful examples on how to write code for the Pico using C. C is low-level, efficient, but also time-consuming to get things up and running. That’s why I recommend that for rapid prototyping, developers consider using the MicroPython SDK.
MicroPython is a port of C Python for microcontrollers. The image size for the Pico is around 500 KB, which seems large and excessive to a C developer; However, the RP2040 has 2MB of flash! That’s plenty of space to write Python scripts and applications with plenty of room to spare. I’ve found that writing applications in Python are faster, more portable, and easy for hardware and software engineers to understand. If you ask an entry-level engineer to write C code, they are slow and struggle. Ask them to write some Python code for you, they’ll code circles around you and leave you trying to find things for them to do.
Tip #3 – Use rshell to Interact with the Board
To build on Tip #2, there is a great application that can be used to interact with the Raspberry Pi Pico when MicroPython has been installed on it called rshell. rshell is a remote shell for use with MicroPython. Developers can connect their Pico board, open rshell and it will create a serial connection to the Pico.
Once the serial connection has been enabled, developers can use shell commands like cp to copy files between a host and the Pico or vice versa. They also can access the Python command line, known as the REPL, so that they can issue Python commands. An important command to be able to give CTRL-D is used to restart the MicroPython environment and run the application (if one is present).
Tip #4 – Explore the Multicore Examples
The Raspberry Pi Pico is a dual-core microcontroller. Developers can write applications that leverage both cores! Yes, true concurrency in a low-cost microcontroller. Writing multicore applications always seems like a hassle, but the Pico examples are straightforward to understand.
Again, developers need to decide which SDK they want to use. The C SDK examples contain several examples of how to write multithreaded applications, share data between cores, and interact with the programmable I/O. The MicroPython SDK examples contain just a single example. While this might seem to be a bit off-balanced, MicroPython uses a thread library that abstracts out the low-level details. Since MicroPython is a high-level language, the low-level details are just not something that developers need to worry about. The APIs are simpler and the code is quite a bit easier to understand.
The advantage to using multiple cores in rapid prototyping is that one core can be tasked with one activity while the other core is tasked with another. This can improve throughput, performance, and even help to decompose the application code.
Tip #5 – Attend the free DesignNews CEC Course on the Raspberry Pi Pico
Coming up at the end of January 2022, the DesignNews Continuing Education Center will make available a free course that covers the fundamentals of the Raspberry Pi Pico. The course will be entitled, “Getting Started with the Raspberry Pi Pico” and presented by yours truly. Attendees will have the option of getting hands-on, which is always fun to attend a course where you can use the hardware.
Despite many tips in this blog being MicroPython oriented, the course will focus on using C SDK for the first four sessions and then on the last session show everyone how to install MicroPython and use it.
Conclusions
The Raspberry Pi Pico opens a wide range of development options at a very low cost. The Pico’s SDK’s make it interesting to both professional developers and makers. For professionals, I see the Pico as a great low-cost rapid prototyping platform for proofs-of-concept. With the low cost, it may even be a viable component to build into a product depending on the product needs, volume, and so forth.
Jacob Beningo is an embedded software consultant who works with clients in more than a dozen countries. He has published many blogs to count embedded software architecture, processes, and development techniques. He holds three degrees, including a Master of Engineering from the University of Michigan. Feel free to contact him at [email protected], at his website www.beningo.com, and sign-up for his monthly Embedded Bytes Newsletter.
About the Author(s)
You May Also Like


