Sign up for the Design News Daily newsletter.
GoPiGo Turns a Raspberry Pi Into a Robot Car 26813
Take a look at the GoPiGo robotics kit that lets students and hobbyists build a programmable mobile robot.
August 15, 2016
6 Min Read
.svg?width=850&auto=webp&quality=95&format=jpg&disable=upscale "GoPiGo Turns a Raspberry Pi Into a Robot Car")
The Raspberry Pi is a versatile, low-cost Linux computer with variety of applications and projects documented in books and on the Web. Raspberry Pi applications range from wearable devices to DIY home security systems. One application that is becoming common with the Raspberry Pi in schools, maker spaces, and the home, is robotics. I've recently came across a kit called GoPiGo that allows the Raspberry Pi to be transformed into a mobile robot.
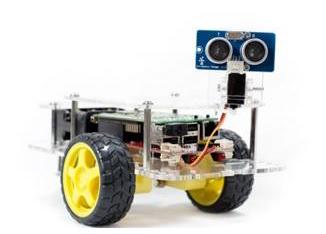
The GoPiGo robot car with servo-controlled ping sensor.
(Source: Dexter Industries)
GoPiGo Robot Car Kit
The GoPiGo Robot, designed and manufactured by Dexter Industries, is a mobile robot kit that uses a Raspberry Pi as the main CPU for the mechatronics machine. The kit comes with all the parts needed to build the mobile robot. Dexter Industries designs and manufacturers educational robot kits that are used in colleges, K-12 schools, and research institutes. Dexter Industries believes that "everyone should be able to build, learn, and experiment with robotics." The GoPiGo robot can easily be integrated with other programmable platforms and construction kits such as the Arduino and Lego Mindstorms.
Kit Contents
When my GoPiGo kit arrived, I was quite amazed of the parts included within the box. All of the fasteners, battery pack, robot control circuit board, battery snap connector, 3D-printed parts (robot body, motor brackets, and encoder wheels) were included in the kit. The only item not included was a Raspberry Pi.

The GoPiGo Base kit includes all the necessary parts to build a mobile robot.
Additional accessories such as a ping sensor (ultrasound), WiFi dongle, and servo package will provide enhancement features for the base kit.
![]() BattleBot Engineers. Medical device engineers by day, BattleBot robot builders by night. See how two teams use design and build elements learned in one world to help the other. Hear their stories and check out their amazing feats of robot destruction at Design & Manufacturing. Sept. 21-22, 2016 in Minneapolis. Register here for the event, hosted by Design News’ parent company UBM.
BattleBot Engineers. Medical device engineers by day, BattleBot robot builders by night. See how two teams use design and build elements learned in one world to help the other. Hear their stories and check out their amazing feats of robot destruction at Design & Manufacturing. Sept. 21-22, 2016 in Minneapolis. Register here for the event, hosted by Design News’ parent company UBM.
Robot Circuit Board Technical Specifications
The GoPiGo kit comes with a small red control circuit board for operating the DC motors of the robot. At the heart of the board is an ATmega328p bit microcontroller. Both DC motors, LEDs, and encoders controls signals are managed by the 8-bit microcontroller. The ATmega328 is hardwired to the Raspberry Pi Broadcom processor by way of a TI TXS008E voltage translator integrated circuit. The voltage translator IC allows exchange of controls signals between the Broadcom processor and an ATmega328 microcontroller using dual header connectors on both programmable boards. Also, the voltage translator IC is used to interface the 3.3V compliant pins of the Raspberry Pi with the 5V logic level GPIO ports of the ATmega328p microcontroller.
Besides the electrical interface between the Raspberry Pi and the Arduino, the robot circuit board includes a Toshiba Dual Driver IC (TB6612FNG) for operating the GoPiGo's two DC motors. The additional specifications of the board include:
Operating Voltage: 7-12V
Current usage:
300-500 mA (Idle with the Raspberry Pi Model B+)
800 mA-2A (Motors, camera and servo running with the Raspberry Pi Model B+)
External Interfaces:
I2C- 1Port
Serial- 1 Port
Analog- 1 Port
Digital/PWM- 1Port
The robot control circuit board specifications allow several accessories manufactured by Dexter Industries to be programmed on the GoPiGo robot.
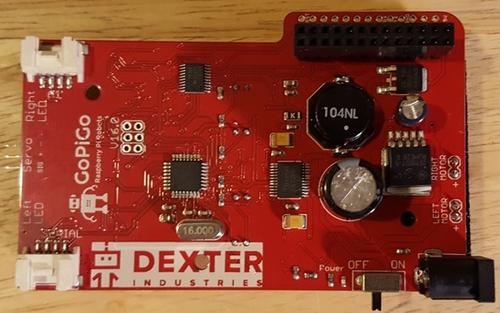
The Raspberry Pi operates the DC motors and encoders attached to the robot control circuit board. The control circuit board uses an ATmega328 microcontroller along with TI voltage translator and Toshiba dual DC motor driver ICs.
Building the GoPiGo Robot
After unboxing the parts, I begin to build my bot using the online instructions provided by Dexter Industries. I was quite impressed with their instructions as each step was easy to read and also featured color pictures showing the assembly of the robot in various stages. Dexter Industries also provides helpful video clips to aid in the assembly.

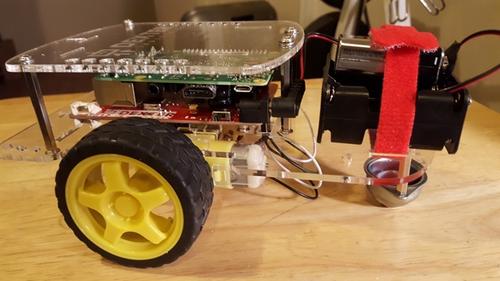 The online videos aid in attaching the Raspberry Pi to the Robot Control circuit board (top). The completed GoPiGo robot (bottom).
The Robot Control Software
After building the GoPiGo robot, the next phase of the project was to add the control software. The Raspberry Pi makes adding operating systems convenient by using SD cards. The SD card contains the linux distro which is the operating system for the Raspberry Pi. Dexter Industries provides all of the example code, documents, and the linux distro on a SD card. Once the SD card was inserted into the connector, the robot can be powered either by using the battery pack or a 5V power adapter. I prefer using the AC adapter during programming and debugging of the Raspberry Pi because of battery power consumption. After the Raspberry Pi boots up, the attached HDMI monitor displays the Dexter Industries logo along with several folders on the desktop screen.
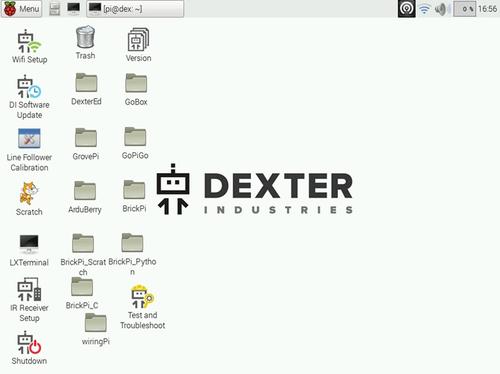
Dexter Industries' SD card provides a variety of software and programming applications for the Raspberry Pi.
(Source: Dexter Industries)
Programming the GoPiGo Robot
The final stage of the GoPiGo kit project was to program the bot. As shown in the screen image provided by Dexter Industries, there is a variety of robotics applications and example code that can be explored with the GoPiGo robot.
READ MORE FROM DON WILCHER:
To test my GoPiGo bot, I selected the basic_robot.py Python code application. The basic_robot.py code allow basic commands of forward, reverse, and left/right turns to operate the motion of the bot. This application code is buried within several folders of the desktop directory. To make the code easily accessible I located the Python application and copied and pasted it into the" pi@dex" directory.
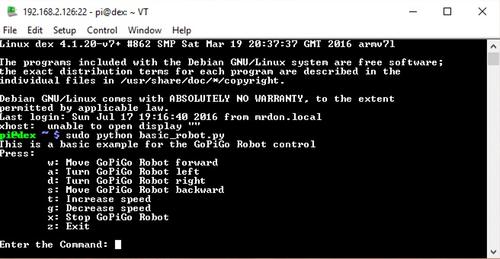
The basic robot python application allows control of the GoPiGo robot using simple one-letter commands.
For my test a WiFi dongle was used to operate my bot wirelessly. I used my Android phone as a wireless controller to operate the bot aided by the WiFi dongle. After configuring the dongle properly, I loaded the basic_robot.py onto the Raspberry Pi. Using the commands shown on the monitor's screen, I was able to easily operate the GoPiGo bot over my WiFi network.
Additional information on pricing, accessories, and projects can be found on Dexter Industries' website.
Don Wilcher is a passionate teacher of electronics technology and an electrical engineer with 26 years of industrial experience. He’s worked on industrial robotics systems, automotive electronic modules/systems, and embedded wireless controls for small consumer appliances. He’s also a book author, writing DIY project books on electronics and robotics technologies. His latest book, Make: Basic Arduino Projects, published by Maker Media, is on the Alabama State Department’s approved Career and Technical Education (CTE) reading list. He’s currently developing 21st century educational training products and curriculum focusing on Internet of Things (IoT) and Industrial Physical Computing for makers, engineers, technicians, and educators. Besides being an Electrical Engineer, he’s a Certified Electronics Technician with ETA International and Alabama State Certified Electronics Instructor.
[Images via Don Wilcher, except where noted]
You May Also Like
Editors' Choice


Jun 4 - Jun 6, 2024
Jun 4 - Jun 6, 2024
Innovation in automation starts here. Discover and collaborate on automation solutions that are revolutionizing the entire production lifecycle — from design to production to market — and sharpen your competitive edge. ATX South is part of IME South, a six-in-one expo offering the latest insights & solutions spanning medtech, packaging, automation, plastics, design, & processing.
Register Now