Sign up for the Design News Daily newsletter.
The Autonomous Zombie Defense System 26761
Halloween will be here before you know it. And the zombie apocalypse may come even sooner. Best to prepare yourself by building your own security system to safeguard against the walking dead.
August 18, 2016
3 Min Read
.svg?width=850&auto=webp&quality=95&format=jpg&disable=upscale "The Autonomous Zombie Defense System")
We all know how the world is really going to end -- zombies. You know the rules (aim for the head) but you can't be everywhere all the time. Best to build yourself a defense system to watch your back.
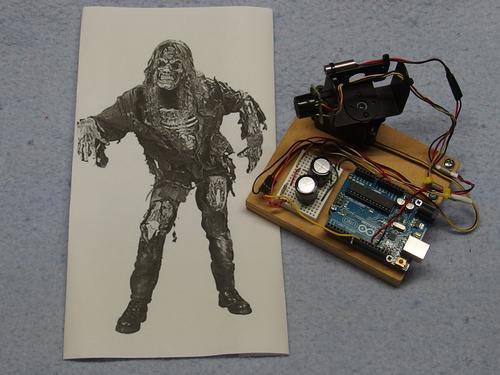
The Zombie Defense System automatically learns the shape of a given area (distances to objects at various angles). It will then actively scan the area using an ultrasonic sensor and fire a laser at any approaching zombies. The system is run off of a Arduino Uno R3 and can also be connected to a PC via USB for data readouts.
Michael Frenzer, a professor at Harper College in Palantine, Ill., conceived of his Zombie Autonomous Defense System as a coding project for his students. Of course to actually defend against zombies you'll need to use a more powerful laser than the 2.5mW one called for in this project. But hey, we don't judge -- especially when the living dead are scratching at your door.
Parts List |
|
|
Amount | Part Description | Allied Part # |
1 | Maxbotix LV-MaxSonar-EZ1 ultrasonic range sensor |
|
1 | Quarton class IIIA 2.5mW dot laser |
|
1 | HiTec HS-422 Servo |
|
1 | Arduino Uno R3 | |
2 | 47uf capacitors | |
1 | 100 ohm, 1/8W, resistor | |
See Description | The "C" servo bracket and (2) #2 x 1/4" self-tapping screws |
|
See Description | The bracket, (2) 2-56 hex spacers, and (4) 2-56 machine screws from one Lynxmotion Multi-Purpose Sensor Bracket Kit model MPSH-01 |
|
1 | Wooden board (or other rigid surface) to mount the servo, |
|
2 | wire clamps (to minimize how much wire movement, caused by the rotation of the sensor and laser wires, by the servo, is transmitted back to the proto strip and Uno printed circuit board. |
|
As needed | Misc items that will vary depending on exactly how you mount the hardware; wood screws (if you use a wooden board), wire ties, spacers under the Uno board, electric tape, wires for making connections to the sensor, laser, proto board, and Uno board. Use stranded wire for wires that will be flexed when the servo turns |
|
Click here to download full build instructions including source code for the Arduino.
Click the image below for a slideshow of the build instructions.
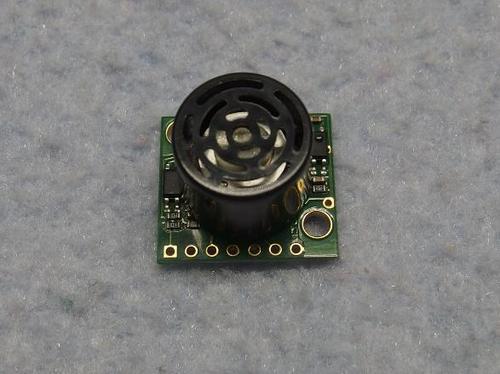
Solder three stranded wires, approximately 16in. long each, to the ultrasonic sensor. In my example I soldered a black wire to ground (GND), yellow red wire to power (5V), and a yellow purple wire to the analog output (AN). Photo 1 above shows the sensor with no wires attached.
Do you have a cool, original, homemade gadget you'd like to share with the world? Give us the details at DesignNews.com/GF, and you may receive $500 and automatic entry into our $6000 Gadget Freak of the Year contest!
[All images courtesy of Michael Frenzer]
You May Also Like
Editors' Choice
.jpg?width=300&auto=webp&quality=80&disable=upscale)


Jun 4 - Jun 6, 2024
Jun 4 - Jun 6, 2024
Innovation in automation starts here. Discover and collaborate on automation solutions that are revolutionizing the entire production lifecycle — from design to production to market — and sharpen your competitive edge. ATX South is part of IME South, a six-in-one expo offering the latest insights & solutions spanning medtech, packaging, automation, plastics, design, & processing.
Register Now