March 25, 2015

Design engineers will feel like kids in a candy store with the Cypress Semiconductor BLE Pioneer Kit. The development kit for low-power sensor-based systems is full of wireless wonder and exploration.
As I stated in my previous blog, I am examining the kit closely, as many designers today are investigating IoT-enabled devices using wireless sensor systems, and the Cypress development kit provides a route for prototyping and development work.
MORE FROM DESIGN NEWS: A Peek Into Cypress' BLE Pioneer Kit for IoT
A prepackaged CapSense touch application allows you to explore the wireless capabilities of the kit immediately. Upon inserting a 3V coin cell battery to the baseboard and attaching the CySmart USB dongle to a desktop PC or notebook computer, the dongle's LED intensity can be controlled with the CapSense slider.
There are several BLE applications to investigate with the kit, but the "Find Me" BLE device was my first choice. I wanted to explore the Find Me application first because of the baseboard's RGB LED output control feature using a mobile device. Also, I wanted to see if I could modify the original application to control other electronic devices and gadgets with a smartphone, as well.

Find Me is a wireless application that can help locate missing objects like car keys, TV remotes, and even a wallet, using an alerting device feature and a smartphone. The Find Me BLE application is based on the Bluetooth SIG (Special Interest Group) version 4.1 specifications of standard services. The Immediate Alert Service (IAS) is a function initiated within the application's C-code used to control the Alert Level operation of the wireless function.
The baseboard RGB LED is used to provide visual indication of the Alert Level. The RGB color used for the alert level indicator is blue. The Alert Level has three output visual warnings: No, Mid, and High. The Mid Alert Level blinks the RGB LED, while High provides a continuous on state. The No Alert Level turns off the RGB LED. The profile used in determining what the Find Me application does is supported by the GATT (Generic Attribute Profile).

With the Find Me BLE workspace opened in PSoC Creator 3.1 software, I compiled and programmed the wireless application to the PSoC 4 microcontroller (CY8C4247LQ1-BL483). It's quite impressive to see the compilation process in Creator's output window because of the massive wire routing and software files required for the mobile application. The wire-routing and software files are easily generated within a few seconds using Creator.
The learning curve of using Creator is quite low because of the hierarchical schematic and Design Flow process that Cypress embeds in the software. Now, I'm ready to test the Find Me BLE application. The mobile CySmart tool has the Find Me and GATT applications installed on my Android smartphone (Moto X). The software profile is instantiated on the smartphone based on IAS GATT client-server architecture. If the smartphone's Bluetooth function is not turned on, don't worry -- the Find Me application will enable it.
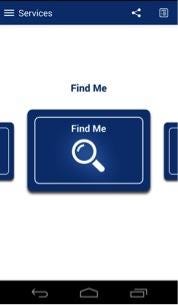
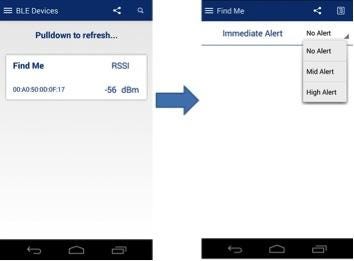
Upon opening the application on my Moto X smartphone, the Find Me advertisement is displayed on the phone's screen. The advertising information displayed is the RSSI (Received Signal Strength) in dbm (decibel meters) units and the UUID (Universally Unique Identifier) of the target PSoC 4 BLE device. A touch of the screen will advance to the Find Me and GATT applications.
Once the Find Me application is selected, the real fun begins. Initially, the No Alert Level function is shown on the smartphone's screen. Pressing the arrow on the drop-down box will list the Mid and High alert levels. Selecting either alert level will allow the RGB to blink (Mid) or stay on continuously (High). The No Alert level turns off the RGB LED. With the main application's wireless functions tested and observed, I decided to enhance the alert level feature by adding an audible alarm to the design.

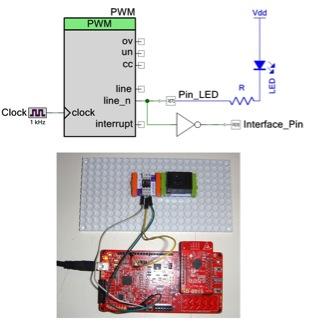
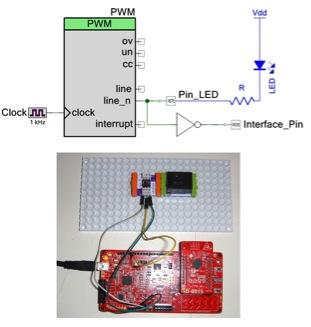
I did this by adding a control interface port to the existing hierarchical schematic design. Since the PSoC 4's output port P3.7 is an Active Low driver, I included an inverter to provide a +5 V signal to turn on the littleBits' buzzer at port P0.3. This small modification allows both the RGB LED and the littleBits' buzzer to turn on and off synchronously. Next, I physically wired this control interface port to a littleBits buzzer.
The littleBits product line is made up of small electrical-electronic modules that can be used in PSoC BLE designs to rapidly develop the physical UI (user interface) for Proof of Concept wireless devices prototypes. The line includes electrical-electronic modules as two-digit LED displays, IR-based remote sensors, pushbuttons, motors with electronic drivers, and a WiFi board. Wiring the Pioneer kit's baseboard to the littleBits buzzer consists of taking a wire from port P0.3 and attaching to a proto board. The +5 V and ground (GND) lines of the baseboard are wired to the littleBits' proto board, as well.
MORE FROM DESIGN NEWS: Electronic Learning Toys Can Help Educate the World
Touching the alert levels of the Find Me application on my smartphone allowed not only a visual indicator to be present but an audible alarm, as well. I'll be exploring additional wireless applications using the BLE Pioneer kit, electronic accessory circuits, and littleBits products in future blogs.

But before that, I'll be presenting the microcontrollers found in this Cypress kit in my weeklong Design News online course titled, "Getting Hands-On with Cypress' PSoC" . The series of classes -- part of the publication's Continuing Education Center (CEC), sponsored by Digi-Key, and where attendees can earn IEEE Professional Development Hours -- will be held March 30 to April 3.
Don Wilcher is a passionate teacher of electronics technology and an electrical engineer with 26 years of industrial experience. He's worked on industrial robotics systems, automotive electronic modules/systems, and embedded wireless controls for small consumer appliances. He's also a book author, writing DIY project books on electronics and robotics technologies. His latest book, Make: Basic Arduino Projects, published by Maker Media, is on the Alabama State Department's approved Career and Technical Education (CTE) reading list. He's currently developing 21st century educational training products and curriculum focusing on Internet of Things (IoT) and Industrial Physical Computing for makers, engineers, technicians, and educators. Besides being an Electrical Engineer, he's a Certified Electronics Technician with ETA International and Alabama State Certified Electronics Instructor.
About the Author(s)
You May Also Like


