Tired of your smartphone? You can follow this inventor’s example and create a working rotary dial cellphone instead.
May 12, 2020

|
(Image source: Justine Haupt |
Justine Haupt is the owner of her own open-source hardware company as well as a developer of astronomy instrumentation at Brookhaven National Laboratory.
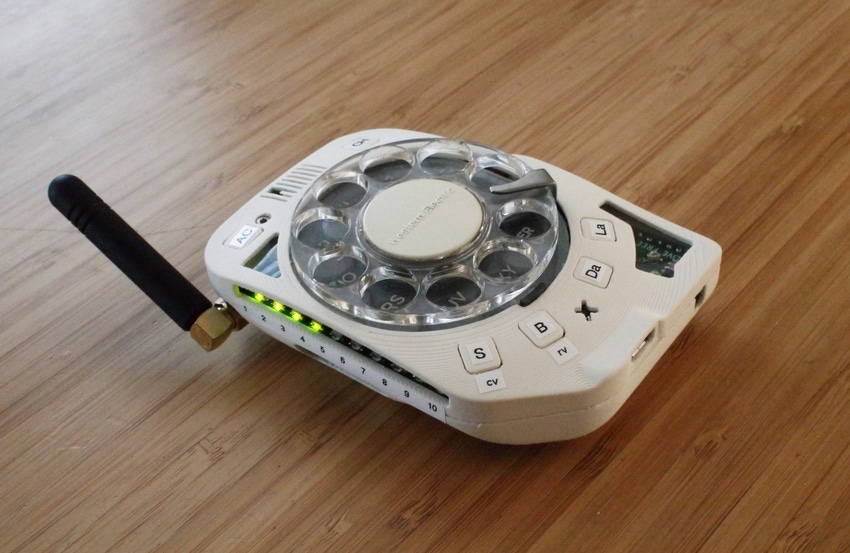
She’s also pretty disillusioned with modern smartphones. Tired of the cumbersome design, overwrought interfaces, and constant distractions of social media and other apps, Haupt decided to go in a completely different direction – taking a cue from the phones of yesteryear to make her own simplified cellphone with a rotary dial.
No apps, no texting, no touchscreen – just a phone. All it took was a rotary dial and a cellular transceiver evaluation board. And she’s sharing the plans to build your own rotary cellphone freely on the internet.
In an essay written for Nautilus magazine, Haupt explained the reasoning behind her project:
“I could finally have a phone, I thought, that is entirely mine, as tactile as I can imagine—one that behaves the way I want it to (and with no need to write the firmware necessary for texting!). It would be wacky, sure, but that wouldn’t be the point. The point would be to have a real, usable phone, one as far from having a touchscreen as possible while being a slap in the face to smartphones because, in a few ways, it would actually be more functional.”
According to Haupt her rotary phone (which she says has become her primary phone) actually has some advantages over your average touchscreen smartphone: an external antenna with better reception; detailed, instantaneous signal strength and battery metering; a slide switch power control; and a battery life in excess of one day. She’s also affixed an ePaper display to the back to display fixed messages – like missed calls.
On her own website Haupt discusses a bit of the iteration process to create the phone. She started simple – using an Arduino Micro and placing the whole thing in a 3D-printed enclosure. This proved to be too much of a headache however. Operating the device would often mean breaking or disrupting some part of it. The second version graduated to an ATmega2560 microcontroller, but it could only carry a 2G signal. The final version is based on the low-power ATmega2560V and is programmed in the Arduino IDE.
There’s a full build video below. Haupt has also provided various resources through her website including:
RELATED ARTICLES:
Chris Wiltz is a Senior Editor at Design News covering emerging technologies including AI, VR/AR, blockchain, and robotics.
About the Author(s)
You May Also Like


