Amazing development boards can speed your work and enjoyment of Arduino projects.
April 13, 2021
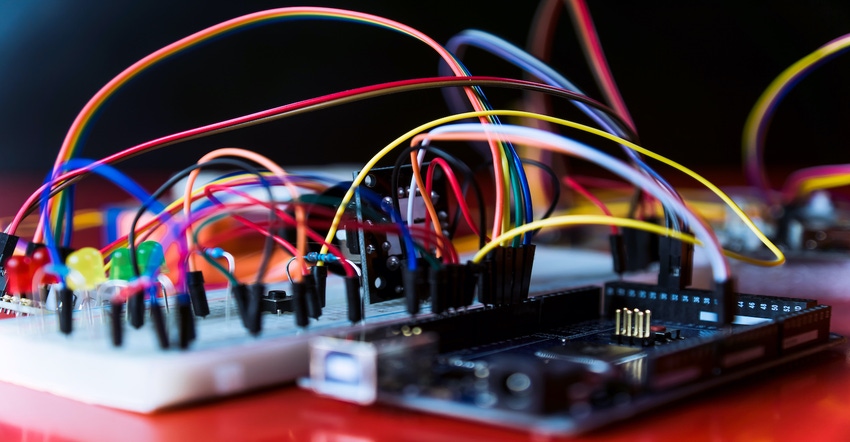
I have a friend (stop laughing -- it’s true -- I’m not going to proceed unless you get yourself under control -- thank you). We will call my friend Guido Bonelli (because that’s his name). Guido has created some amazing development boards -- the Pioneer and the Explorer -- under the Dr.Duino moniker to help people create their Arduino projects and prototypes. As I pen these words, a little tear (of joy) is running down my cheek because I currently have both of these bodacious beauties sitting here on my desk.
Before we plunge headfirst into the fray with gusto and abandon (and, of course, aplomb), let’s first remind ourselves what a typical Arduino project looks like, as illustrated below. This particular example features an Arduino Uno, which has to be one of the most popular microprocessor development boards on the planet for beginners.
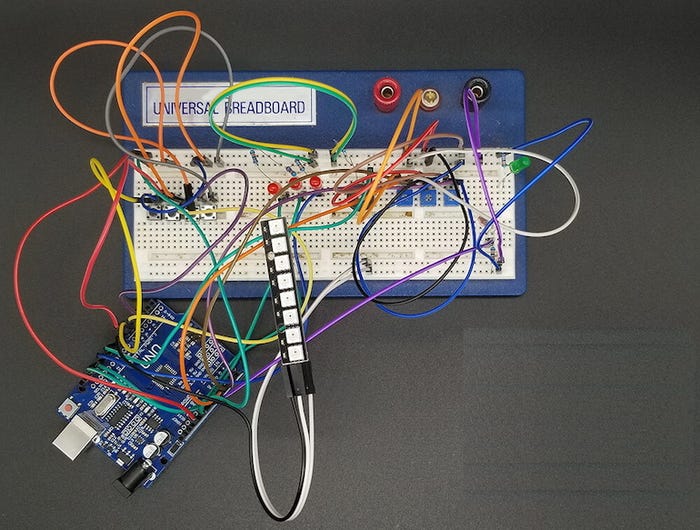
First of all, we see the Arduino Uno in the lower-left-hand corner of the image. A little to the right, we see a stick of eight WS2812B tricolor LEDs (commonly known as “NeoPixels” because that’s what the folks at Adafruit call them). In addition to red, green, and blue sub-LEDs, these little scamps also contain three 8-bit pulse-width modulators (PWMs), thereby allowing each NeoPixel to display 2^8 * 2^8 * 2^8 = 2^24 = 16,777,216 different colors. Also, these little rascals are daisy-chained together, which means we can drive the whole stick using a single digital output from the Arduino Uno.
On the breadboard, we see some tactile pushbutton switches, some discrete light-emitting diodes (LEDs) along with their current-limiting resistors, and some potentiometers (variable resistors). Actually, I think I can also see a piezo buzzer lurking in the center underneath all of the flying leads, but it’s hard to be sure.
Speaking of the flying leads, “Arrgggghhhh!” (and I mean that most sincerely). On the one hand, I really appreciate how useful they are, and I wish we’d had stuff like this when I was first learning electronics deep in the mists of time. On the other hand, they can be a real pain in the nether regions when it comes to trying to determine why one’s creation isn’t performing as planned. Even worse is when you pick things up to move them to another location because your wife says she needs you to clear the kitchen table (just to pick a random imaginary scenario out of thin air, you understand) and one or more of the flying leads detaches itself from the Arduino and/or the breadboard. Which wire was it? Where should it be inserted (that was a metaphorical question)?
I don’t know about you, but most of my own projects typically include various combinations of all these elements. Whatever I am working on, I almost invariably require access to a few switches, LEDs, and potentiometers.
Furthermore, most of my current projects typically involve a bunch of NeoPixels, like my 12x12 Ping Pong Ball array, which boasts 144 of the little rapscallions. When I first start a project of this ilk, I often use a small NeoPixel stick as shown above to establish the overall architecture of my code before tunneling down into the nitty-gritty details. Also, if I’ve written my code appropriately, migrating from an 8x1 stick to a 12x12 array should require only a couple of constants to be tweaked (in this case, I’d use the first four NeoPixels on the stick to emulate a 2x2 array).
Are You Feeling Like a Pioneer?
If you are just starting out in electronics, then the Dr.Duino Pioneer Edition offers a really good place to begin. As seen below, this is a shield that plugs directly into the top of an Arduino Uno, one of which is included with the kit. The shield provides four pushbutton switches (in addition to a Reset pushbutton), three potentiometers, a light-dependent resistor (LDR), three red LEDs and a green power LED, and a bunch of current-limiting resistors. The shield also provides a piezo buzzer and a stick of eight NeoPixels.
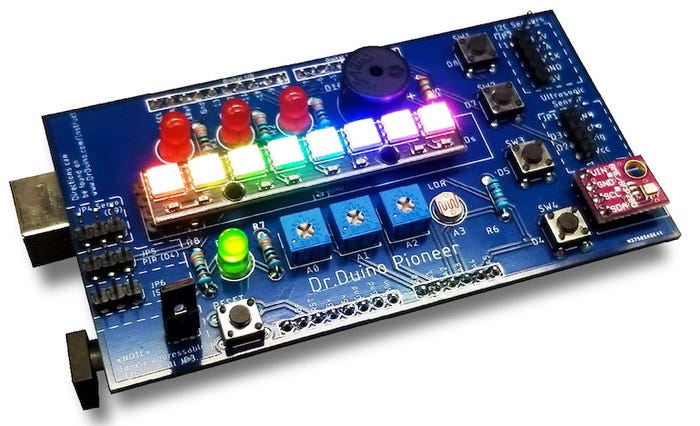
Not shown here is the fact that the Pioneer kit also includes an ultrasonic distance measuring sensor and associated cable to connect the sensor to the shield. Also, there are pins into which you can plug a variety of I2C-based sensors and actuators (see the discussions on the Expansion Pack later in this column).
Speaking of kits, it’s important to note that both the Pioneer and the Explorer are presented as kits that you assemble yourself. I have to say that Guido has put a humongous amount of effort into all of this. When you purchase a Dr.Duino kit, you are provided with access to the Dr.Duino Labs. There you will meet an online wizard that walks you through things like suggested tools and safety equipment (there’s also a soldering guide for absolute beginners) and a detailed parts list with an associated photo of everything you should expect to see, all leading up to the best step-by-step assembly instructions accompanied by gorgeous high-resolution photos that it’s ever been my privilege to see, and I do not say this lightly.
Once you’ve assembled the shield, the system guides you through downloading and installing the Arduino’s integrated development environment (IDE), running some simple sketches (programs), installing the Dr.Duino library, and running some more sophisticated sketches. Eventually, you are ready to tackle a bunch of provided projects that will introduce you to various aspects of the Pioneer shield in a fun and informative way. One such example is a Larson Scanner. Do you remember KITT from Knight Rider or the Cylons from Battlestar Galactica? Well, you can use your Pioneer to implement your own versions of those iconic cycling lights!
Even better, Guido has partnered with a company called the Programming Electronics Academy (PEA), through which you gain access to a bunch of videos FOR FREE that will teach you how to program the Arduino. All I can say is that if something like the Arduino and the Dr.Duino Pioneer had been available when I was a teenager, I would be ruling the world by now.
Do You Feel Like an Explorer?
For those who have more ambitious projects in mind, the Dr.Duino Explorer Edition is the way to go. The Explorer provides all the capabilities of the Pioneer (switches, LEDs, potentiometers, LDR, piezo buzzer, ultrasonic sensor...), along with a cornucopia of additional capabilities.
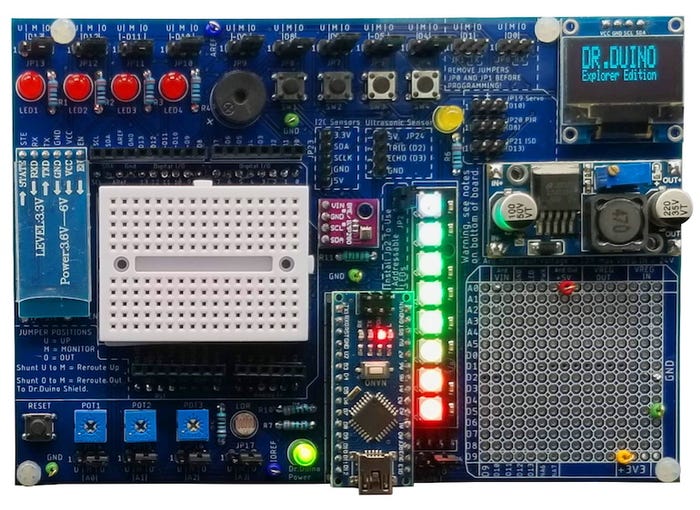
There’s a lot to see here, so let’s take things one step at a time. Do you recall that the Pioneer kit includes an Arduino Uno? Well, the Explorer kit includes an Arduino Nano, which you can see plugged into the lower center of the above picture. Alternatively, if you wish, you can remove the Arduino Nano and then plug the Explorer into an Arduino Uno (you can see the headers in the Arduino Uno footprint surrounding the small breadboard on the left-hand middle of the above picture).
As for the Pioneer, there are pins into which you can plug a variety of I2C-based sensors and actuators (see the discussions on the Expansion Pack later in this column). Also, there’s an organic LED (OLED) display in the upper right-hand corner of the board, there’s a very handy area where you can add discrete components and integrated circuits in the bottom right-hand corner, and there’s a rather meaty voltage regulator just below the OLED display.
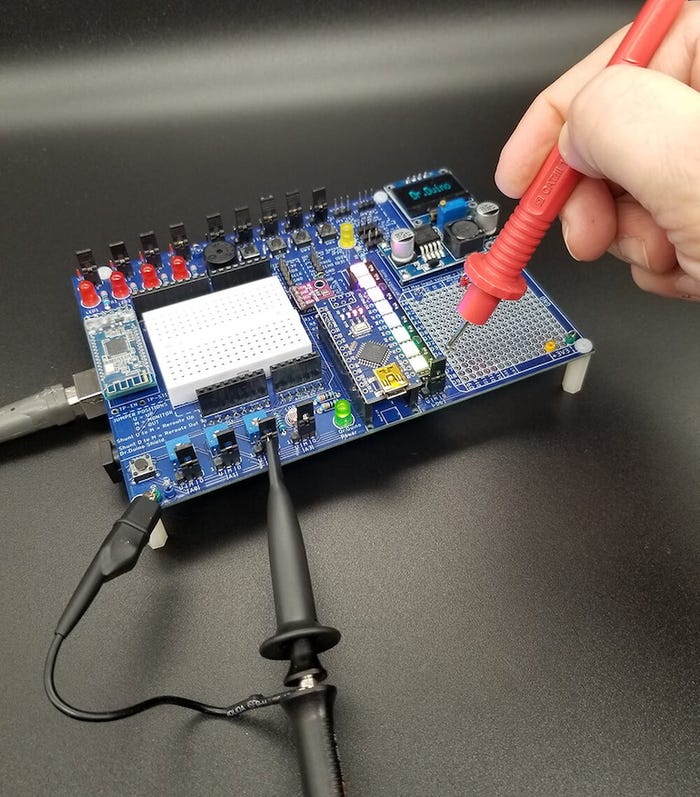
One very important point for those who really want to get stuck into the nitty-gritty of things is the fact that -- as illustrated in the image above -- the Explorer is designed to facilitate the debugging of your projects, including easy access to all of the Arduino’s pins and power and ground connections.
As before, the Explorer comes equipped with incredibly detailed assembly instructions and a bunch of projects to keep you busy for quite some time.
I’m Feeling Expansive
When you are ready to proceed further, the Expansion Pack may be of interest. This is available for purchase as a standalone item or as part of the Pioneer PLUS Edition and Explorer PLUS Edition kits.
The Expansion Pack includes a six degrees of freedom (6DOF) accelerometer and magnetometer sensor that can be used to detect motion and orientation; an atmospheric sensor that can measure temperature, humidity, and barometric pressure, and that can be used as the heart of a micro weather station; a sound effects board (with amplifier and speaker) that allows you to record and playback up to 10 seconds of sound or music; a passive infrared (PIR) sensor that can be used to detect people or pets moving; a micro servo so you can make things move; and a bunch of flying leads.
In addition to the components and printed graphics, the Expansion Pack’s plastic package doubles up as a Project Box for the four demo projects, which are included. These projects -- an ultrasonic-based social distancing machine, a thermometer, a bubble level, and a Halloween prop maker -- come equipped with associated demo code.
But Wait, There’s More!
To be honest, I’ve barely scratched the surface of all Dr.Dunio has to offer. Every few days, I receive an email detailing new projects that have been implemented using the Pioneer or Explorer kits. For example, consider this video of the Reactive Lighting project Guido used to enhance his radio controller (RC) racing car.
Additional things seem to be popping up all the time, like the Dr.Duino Model Railroad Edition, which will definitely be of interest to model radio enthusiasts who want to learn about the Arduino and use it to add sophisticated control capabilities and sound/lighting effects to their railroad dioramas.
I’m blown away by all of the creativity and effort Guido has put into this, and, once again, I’m awed by all of the tender loving care he’s applied to the step-by-step assembly instructions and gorgeous high-resolution photos. How about you? As always, I’d love to hear your comments, questions, and suggestions.
Clive “Max” Maxfield received his B.Sc. in Control Engineering from Sheffield Hallam University in England in 1980. He began his career as a designer of central processing units (CPUs) for mainframe computers. Over the years, Max has designed all sorts of interesting “stuff” from silicon chips to circuit boards and brainwave amplifiers to Steampunk Prognostication Engines (don’t ask). He has also been at the forefront of electronic design automation (EDA) for more than 30 years. Already a noted author of over a half-dozen books, Max is always thinking of his next project. He would particularly like to write for teens, introducing them to engineering and computers in a fun and exciting way. This is what sets “Max” Maxfield apart: It is not just what he knows, but how he relates it to the learner.
About the Author(s)
You May Also Like


