We discover how long it takes to upload 100 NeoPixels.
August 4, 2022

Hi there, and welcome to Part 5 of this originally-planned-to-be-a-3-part trilogy. Actually, I don’t feel too bad, because there ended up being eleven novels in the legendary Brentford Trilogy by Robert Rankin. I only wish I had Robert’s talent with titles, such as The Brentford Triangle, East of Ealing, and The Sprouts of Wrath.
In Part 1, we ambled our way to the idea of light-emitting diodes (LEDs). In Part 2, we rambled through the concepts of forward voltage drop (VF), maximum forward current (IF), and current-limiting resistors. In Part 3, we meandered through the notions of pulse-width modulation (PWM), and tricolor red, green, and blue (RGB) LEDs. And, most recently, in Part 4, we surprised ourselves by finally coming to meet and greet WS2812 tricolor LEDs (aka NeoPixels).
So, is there anything left for us to talk about? Well, much like my dear old mother, the real trick is to get me to stop talking, so let’s see where we go from here.
There are various software libraries we can use to control our NeoPixels. We’ll start with the one from Adafruit because—even though it may not be the most sophisticated—it’s easy to wrap our brains around and use. The first step is to go to Adafruit’s website and discover how to download and install the library. Next, let’s peruse and ponder the following program (or “sketch” in the vernacular of the Arduino).

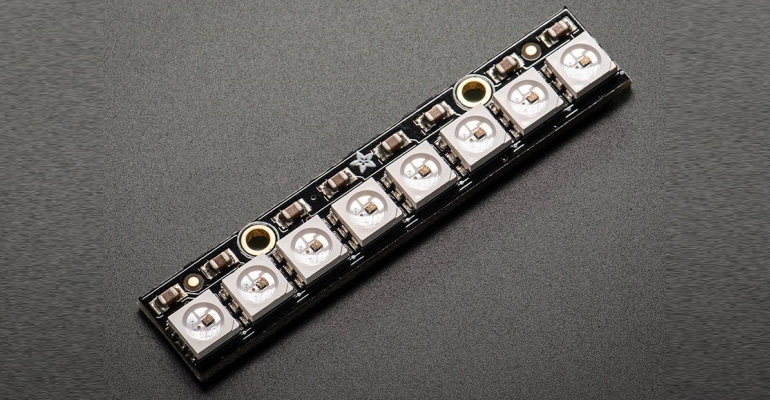
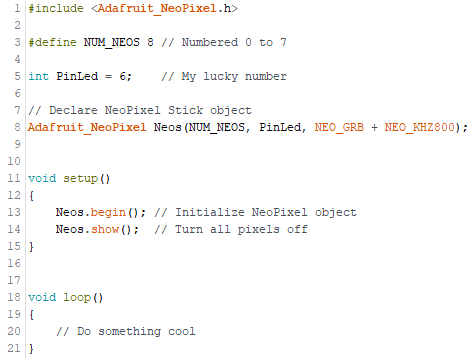
On Line 1 we include Adafruit’s NeoPixel library. On Line 3 we define the number of NeoPixels in our string to be 8 (we will actually reference these as 0 to 7 in our code). The reason for using this number is that before we’re much older we’re going to be creating some simple experiments to run on an 8-Element NeoPixel Stick. On Line 5 we declare an integer variable called PinLed to which we assign a value of 6. This is the pin we are going to use to drive the stick. The only reason we picked pin 6 is that six is my lucky number (or it would be if I were superstitious).
![]()
As you’ll see, my personal coding conventions include using uppercase with underscore characters for constant values. Meanwhile, I use CamelCase, also known as PascalCase, for my variables, whereby multiple words are joined without underscore characters or spaces and with the first letter of each word being capitalized. In fact, I use UpperCamelCase for my global variables (the very first letter is also capitalized) and lowerCamelCase for my local variables (the very first letter is lowercase). I also used 4-space indentation and my ‘{‘ characters are vertically aligned over their corresponding ‘}’ counterparts.
Line 8 is where we declare our NeoPixel Stick object. We start by giving it a name, which can be anything so long as it’s not a reserved word or a previously declared something or other. I typically use the name Neos, but you can feel free to improvise here. There are three arguments to this definition. The first is the number of NeoPixels in the string. The second is the pin we’re going to use to drive them. And the third is formed as a logical OR of two keywords: NEO_GRB defines the internal ordering of the LEDs (don’t worry about this) and NEO_KHZ800 specifies the upload frequency as being 800 kHz (don’t worry about this either).
On Line 13 we initialize our NeoPixel object (including turning all of the pixels off). On Line 14 we upload these new values into the NeoPixel string (we’ll discuss this aspect of things in a little more detail in a moment).
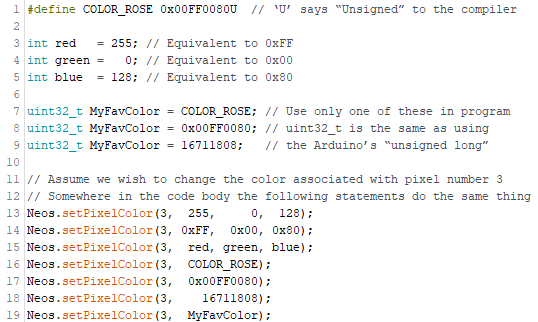
The next thing we need to introduce is the setPixelColor() method. The easiest way to dip our toes into these waters is to consider the following definitions and statements (note that the line numbers are just to give us something to reference and are in no way related to our previous code example).

I think that this is reasonably self-explanatory, but I can’t stop myself from doing a little explaining anyway. The setPixelColor() method being used on Lines 13 through 19 can accept either two or four arguments. The first argument specifies the number of the pixel whose color we wish to change (remember we’re assuming a string of 8 pixels numbers 0 to 7 in these examples).
If we wish, we can specify the color we want to assign as three 8-bit values corresponding to the red, green, and blue sub-LEDs, respectively. Alternatively, we can specify the color as a single 24-bit value, which is typically much more convenient. In the Arduino world, an unsigned long variable is 32-bits in size, and these are what we use to store our 24-bit colors (the most-significant 8-bits are ignored). I personally use the uint32_t data type, which—for the purposes of these discussions—we can consider to be the same as the Arduino’s unsigned long data type.
Now, this is the interesting part. When we used the begin() method in our setup() function earlier, one of the things that happened was an array corresponding to a 3-byte (24-bit) area for each NeoPixel in our string was created in the Arduino’s RAM. When we use the setPixelColor() method, we don’t actually change the color of a physical NeoPixel in the real world; instead, we modify the color of the corresponding virtual NeoPixel in the Arduino’s memory.
![]()
It’s only when we use the show() method that the contents of the array in the virtual world are uploaded to the string in the real world. When you stop to think about it, this makes a lot of sense. If we were forced to upload the string every time we changed the color associated with a single pixel, we’d spend all of our time uploading. Using the approach described here, we can specify the desired colors of any of the pixels in the virtual world, and then transfer these colors to the pixels in the real world.
One last point to consider is the amount of time it takes to unload the new color values into the physical string. For each pixel we have to upload 3 x 8 = 24 bits. As we previously discussed, we’re using an upload frequency of 800 kHz. So, if we have a string of 100 NeoPixels, for example, then the upload time will be (24 x 100) / 800,000 = 0.003 seconds = 3 milliseconds (ms).
On the one hand, this is a small amount of time, but we still need to account for it, especially for projects that have hundreds or thousands of NeoPixels. As we will see in future columns, there are ways around this that allow us to carry on performing other tasks while the uploading takes place in the background, but that will be a conversation for a future column.
About the Author(s)
You May Also Like


