How to Build Alexa-Controlled DIY Smart Lights
Here's how to build your own smart lights that not only sense motion, but can also respond to Alexa commands and even send text and email notifications.
January 10, 2019


While there are more than a few applications that would benefit from a motion detector connected to a light or alarm, my first priority is the dark hallway to my bathroom.
 This offering is a voice-actuated sensor, voice-configured PIR senor-based light that can light a dark hallway and double for a security monitor or a smart light for your yard or driveway. It won't just turn on a light. Thanks to an MQTT or IFTTT (If This, Then That) link or service, it can text you the time of an event, trigger a sequence of events, or even dial 9-1-1.
This project includes an Alexa voice-based light on, light off, set floor light time (10 to 99 seconds), and enable action modes for off, light, and/or email services.
There are two packaging form factors. The first was installed into a Sonoff Basic 8266.The second has less hardware, but uses an NMOS transistor to switch the light fixture. Both have any difference in their code integrated into the provided .ino program file and selected with a few Boolean flags. The differences are limited to changes in pin allocations available from the Sonoff and the ESP-01.
PARTS LIST
Quan | Decription | DigiKey# | Used on | Notes |
|
1 | Sonoff Basic | N/A | Sonoff assembly | Module |
|
1 | ESP-01 | N/A | ESP-01 assembly | Module |
|
1 | HC-SR501 PIR IR detector | N/A | Both | Module |
|
1 | 9 Volt wall supply(110v-9V,650ma) | 1470-2773 | Both | (used matching barrel set) | |
1 | 4.7K | CF14JT4K70CT | ESP-01 assembly |
|
|
1 | 1K | CF14JT1K00CT | ESP-01 assembly |
|
|
1 | 3.3V regulator AMS1117 | AMS1117 | ESP-01 assembly | (used 9-3.3V module) | |
2 | 2Pin male header | 277-1667-ND | Sonoff assembly |
|
|
1 | LED-Grn | 350-1611 | ESP-01 assembly | (used LED thru-hole) | |
2 | NMOS HexFET transistor | IRFZ44NPBF | ESP-01 assembly |
|
|
2 | LED 12V light strip | N/A | ESP-01 assembly | (used~19"12 LED light bar) |
Click here to download the source code file.
It is coded to allow functions to be Alexa, voice, and cell phone based and to allow Alexa routine-based timing and customized sequences to be created from its app.
The hardware uses only the pins available on the module. The module is post regulated from +5 volts found on the board. A header is required to be installed to re-code the processor and those pins. A tapped +5 volts taken from the Sonoff module is also exploited in this project.
The Sonoff Basic’s module is hardwired on its circuit board. The relay to pin 12, button (pin 0), and the module’s LED control are found on pin 15. Included on the installed header, referring to the schematic, the hardware uses the TX/RCV, fixed to pins 1 and 3 with ground. The 3.3V and pin 14 are also available and are uncommitted. With minimal changes, an ESP-01 module can be used for applications that don’t warrant a Sonoff Basic. The ESP-01 provides pins 0,1 (Tx), 2 and 3 (Rcv) to its header and does not provide power, button, LED, or a relay.
The included coded application provides the required SMTP protocol format and specific message used in this project, including the ‘time.nist.gov’ based time tag. It is part of the project recipe and may be considered a part of your tool box. Basically, the application sends a formatted SMTP message request to the server and the server forwards it to the requested destination. I've found that there are several SMTP server services and other resources to accommodate your custom needs. I have chosen to use smtp2go.com to support this application. The free option provided what I was looking for in an SMTP server.
You can implement this without a server service, by using your own server on either a Sonoff or an ESP-01 module and dealing with your Internet service provider's destination name, input server address, and port information yourself. You may also email directly to your cell phone as an SMS message. For AT&T users, you can send simple messages with your 10-digit phone number (written as one long word with no spaces or hyphens) followed by @txt.att.net. For Verizon, email your phone number followed by @vtext.com, paying attention to use double @ symbols. For Sprint, email the number followed by @messaging.sprintpcs.com. And for T-Mobile, the number is followed by @tmomail.net. Other phone services may have similarly formatted account references.

Including an email service in your application also allows the Alexa-based apps to connect through IFTTT services, using the ‘mail’ trigger, to any of hundreds of IoT-compatible devices based on custom devices.
Alexa can be used as an IFTTT trigger, but does not allow its connected smart devices, with some exceptions, to be directly used in the trigger criteria. Additional code using webhook or adafruitio service may be an alternate choice for emailing. Voice-controlled, custom project data can then be sent thru an IFTTT email or webhook trigger to either a service using a hash tag/passed value in the subject line of or to the io.adafruit MQTT broker directly or indirectly through the IFTTT service. The IFTTT connection, however you trigger it, may then connect to the compatible appliances or another custom application.
In this way, the voice and phone based motion detector described here may be used with an IFTTT service action that's not available from the Alexa, through an Alexa based routine, or available Alexa based app. Used as a security related detector, the IFTTT can also call 9-1-1 or another phone number, send an email, or turn on a light or camera using a ‘very’ simple/easy online applet (recipe). There may be several other ways to do this.
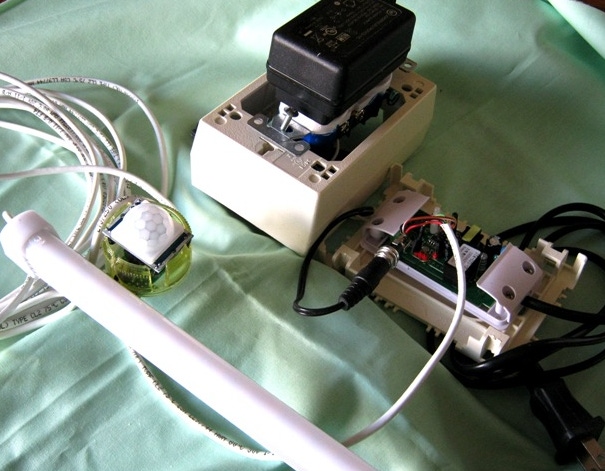
The motion sensor I used in this project to trigger an event was an HC-SR501 PIR IR passive infrared motion detector. It can also operate standalone with both sensitivity and timer adjustments. My application uses the sensitivity adjustment only, while the timer adjustment is set to minimum.

The motion detector was mounted on the end of the LED fixture and installed along the edge of my closet door. Two light fixtures were configured with the power provided inside and along the closet framing. In the Sonoff assembly, this sensor uses the +5V provided from the Sonoff (junction U2 and D5) by including the ‘hay’ wiring, as described in the photo. D0 is also wired and coded to allow a local Sonoff button to initiate a triggered event. The sensor power, in the ESP-01 assembly version, is powered directly from the 9 to 12 volt supply.

Web-based time is a convenience and if WiFi is integral to your application, as it is in this project, you may copy and past code from an assortment of library resources including with this project to substitute it as a real time clock. The time will be provided in GMT. It is included as a portion of the project recipe. While not used to create light timing (and since any delivered email would include a delivery related time tag), you may consider it a token function and include it as part of your tool box.
 The voice commands are coded to use a Sinric based ‘lamp’ to configure the project's mode, light, and message functions, per the table shown. The lamp commands can also be used to set the light delay after triggering, if enabled, from 10 to 99 seconds.
I created a smart device in my Alexa app called “Floor light.” Typical Alexa based configuration commands are: “Alexa set floor light to 4” and “Alexa set floor light to 25.”
For all commands codes, except 100, the app enable/disable and timing settings are saved in nonvolatile memory. The app was set up in an Alexa routine to disable the actions set (… to 1) at 8:00 AM and to re-enable set (... to 2 ,3, or 4) at 4:30 PM. Both the last command/timing related value and sensor enable status are visible on the Alexa and Sinric apps.
The project email is coded to provide an email, as shown below. The email destination field would be substituted with [email protected] and the subject line would be changed to be : #ABCD, where ABCD is something of your own choice and entered in the IFTTT site.
Selecting the “Mail” trigger feature found on the IFTTT site then would trip the IFTTT selected action. The IFTTT is a free service and is based on a trigger initiating an action. The setup in the IFTTT screen is simple and there are several options to initiate this mechanism and hundreds of compatible devices and services that can be accessed.
For questions or should you need any materials, the author can be reached at : [email protected].
[All images courtesy William Grill]
About the Author(s)
You May Also Like


